Denon DN-X1500S Operating Instructions - Page 12
SAMPLER, PFL Pre Fader Level - parts
 |
UPC - 081757507202
View all Denon DN-X1500S manuals
Add to My Manuals
Save this manual to your list of manuals |
Page 12 highlights
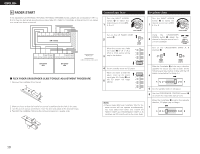
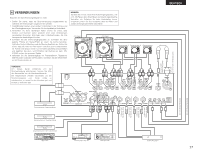
ENGLISH 8 SAMPLER Sampler playback Select the source of Sampler 1 • Turn the ASSIGN switch y in the SAMPLER part to select the desired source. Record in Sampler When the A button i is pushed, the sound of the selected source is recorded to Sampler 2 memory up to 8 seconds. • The A button i flashes after recording starts. • When the recording is completed, B button o lights up. Setting B point / Stop recording When the B button o is pushed during recording, the B point is set. 3 • Recording continues for approximately 8 seconds without stopping after set B point. • If the B point is not set, recording end point set as B point automatically. Setting the Sampler sound level The sound level (volume) can be set for Sampler. 4 • To select "S_Level" turn the MODE/STOP knob u and push. • Turn the MODE/STOP knob u and select between "-14 dB" and "+6 dB". Select Sampler play mode You can select play mode for Sampler when Sampler playback stop. Loop (default): Sampler playback continues with looping. Single: Sampler playback stops at B point. Stutter: Sampler is played while the A button i is pressed and held down. 5-1 Loop + Reverse: Reverse Sampler playback continues with looping. Single + Reverse: Reverse Sampler stops at A point. Stutter + Reverse: Reverse Sampler is played while the A button i is pressed and held down. Exit B: Sampler playback continues over B point up to recording length. To select Loop/Reverse mode, turn the MODE/STOP knob u then push after recording and before playing. q Play mode: • To select "P_Mode" turn the MODE/STOP knob u and push. 5-2 • Turn the MODE/STOP knob u and select "Loop", "Exit B", "Single" or "Stutter". w Play direction: • To select "DirMode" turn the MODE/STOP knob u and push. • Turn the MODE/STOP knob u and select "Forward" or "Reverse". Play Sampler sound • Playback of the Sampler sound starts when the A button i is pushed after recording has completed. 6 • To stop the Sampler sound, push the MODE/STOP knob u. • When the CROSSFADER ASSIGN switch !0 in the SAMPLER part is set A or B, you can perform the Sampler Fader Start by the Crossfader !8. See page 10. Moving Sampler B point • When the B button o is pushed during 7 Sampler playback, the B point moves to the point at which the button was pushed, and Loop playback from point A starts. Setting the Sampler pitch The sound pitch can be set for Sampler. 8 • To select "S_Pitch" turn the MODE/STOP knob u and push. • Turn the MODE/STOP knob u and select between "-100 %" and "+100 %". Clearing the Sampler data 9 • While pressing the MODE/STOP knob u, push the A button i to clear the Sampler. Monitoring the Sampler data (SAMPLER CUE) • When the SAMPLER CUE button !6 is 10 pressed, you can check the Sampler data. NOTE: When the SAMPLER CUE button is lit, the Sampler sound is not output into the Crossfader or MASTER OUT. 12 Sampler A/B Trim 9 PFL (Pre Fader Level) Select A-B Trim mode 1 • To select "A/BTrim" turn the MODE/STOP knob u and push. Select A point (in A-B Trim) 2 • Push the A button i. • The A button i illumination flashes and Loop playback starts. Trim A point 3 • Turn the MODE/STOP knob u. You can move the A point. Save the A point 4 • Push the MODE/STOP knob u to save new the A point. Select B point (in A-B Trim) 5 • Select the A-B Trim mode and push the B button o. • The B button o illumination flashes. Trim B point 6 • Turn the MODE/STOP knob u. You can move the B point. Save the B point 7 • Push the MODE/STOP knob u to save new the B point. 1. Press the SPLIT CUE button @4. 2. Press the CUE button !6 that you wish to monitor 1~ 4 (make sure your source is playing). 3. Turn the GAIN control #5 until the meters peak at the 0 dB level. 4. Perform your mix using the Crossfader !8 or Ch. Fader !9 at your desire. NOTES: • For proper operation, your channel levels should always be set to or left on reference line 8. • This adjustment can be made even if the Ch. Fader is set to zero level.
-
 1
1 -
2
-
3
-
4
-
5
-
6
-
 7
7 -
 8
8 -
 9
9 -
 10
10 -
 11
11 -
 12
12 -
 13
13 -
 14
14 -
 15
15 -
 16
16 -
 17
17 -
18
-
19
-
20
-
21
-
22
-
23
-
24
-
25
-
26
-
27
-
28
-
29
-
30
-
31
-
32
-
33
-
34
-
35
-
36
-
37
-
38
-
39
-
40
-
41
-
42
-
43
-
44
-
45
-
46
-
47
-
48
-
49
-
50
-
51
-
52
-
53
-
54
-
55
-
56
-
57
-
58
-
59
-
60
-
61
-
62
-
63
-
64
-
65
-
66
-
67
-
68
-
69
-
70
-
71
-
72
-
73
-
74
-
75
-
76
-
77
-
78
 |
 |