Denon S-101 Owners Manual - Eng/Span - Page 17
Connecting Other Sources
 |
UPC - 081757506731
View all Denon S-101 manuals
Add to My Manuals
Save this manual to your list of manuals |
Page 17 highlights
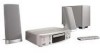
ENGLISH 2 To mute the sound Use this to turn off the audio output temporarily. Connecting Other Sources Connecting Other Sources Press the MUTE button. Advanced setup options Cable indications • Cancelling MUTING mode: q Press the MUTE button again. w Press the VOLUME button on the remote control unit, or adjust the volume up or down via the front panel VOLUME control knob. 2 To stop the playback The hookup diagrams on the subsequent pages assume the use of the following optional connection cables (not supplied). When connecting other equipment, disconnect the power supply cord from the AC power outlet before connecting other equipment. Audio cable A Analog terminal (Stereo) (White) (Red) L L R R Pin-plug cable D Video terminal Video cable (Yellow) Video cable (75 Ω/ohms video pin-plug cable) During playback, press the 2 button. B Digital terminal (Coaxial) E S-Video terminal 2 To turn off the main unit Press the ON/STANDBY switch. (Orange) Coaxial cable (75 Ω/ohms pin-plug cable) C Digital terminal (Optical) Optical cable (Optical fiber cable) S Video cable F Component video terminal (Green) (Blue) (Red) Component video cable (Y) (PB/CB) (PR/CR) Signal direction Audio signal IN OUT OUT IN Video signal IN OUT OUT IN NOTE: • Do not plug in the power supply cord until all connections have been completed. • When making connections, also refer to the operating instructions of the other components. • Be sure to connect the left and right channels properly (left with left, right with right). • Note that binding pin-plug cables together with power supply cords or placing them near a power transformer will result in generating hum or other noise. 14 ENGLISH
-
 1
1 -
2
-
3
-
4
-
5
-
6
-
7
-
8
-
9
-
10
-
11
-
 12
12 -
 13
13 -
 14
14 -
 15
15 -
 16
16 -
 17
17 -
 18
18 -
 19
19 -
 20
20 -
 21
21 -
 22
22 -
23
-
24
-
25
-
26
-
27
-
28
-
29
-
30
-
31
-
32
-
33
-
34
-
35
-
36
-
37
-
38
-
39
-
40
-
41
-
42
-
43
-
44
-
45
-
46
-
47
-
48
-
49
-
50
-
51
-
52
-
53
-
54
-
55
-
56
-
57
-
58
-
59
-
60
-
61
-
62
-
63
-
64
-
65
-
66
-
67
-
68
-
69
-
70
-
71
-
72
-
73
-
74
-
75
-
76
-
77
-
78
-
79
-
80
-
81
-
82
-
83
-
84
-
85
-
86
-
87
-
88
-
89
-
90
-
91
-
92
-
93
-
94
-
95
-
96
-
97
-
98
-
99
-
100
-
101
-
102
-
103
-
104
-
105
-
106
-
107
-
108
-
109
-
110
-
111
-
112
-
113
-
114
-
115
-
116
-
117
-
118
-
119
-
120
-
121
-
122
-
123
-
124
-
125
-
126
-
127
-
128
-
129
-
130
-
131
-
132
-
133
-
134
-
135
-
136
-
137
-
138
 |
 |
