Dewalt D25301D Instruction Manual - Page 2
Attaching and Removing Telescope and Side Handle - parts
 |
View all Dewalt D25301D manuals
Add to My Manuals
Save this manual to your list of manuals |
Page 2 highlights
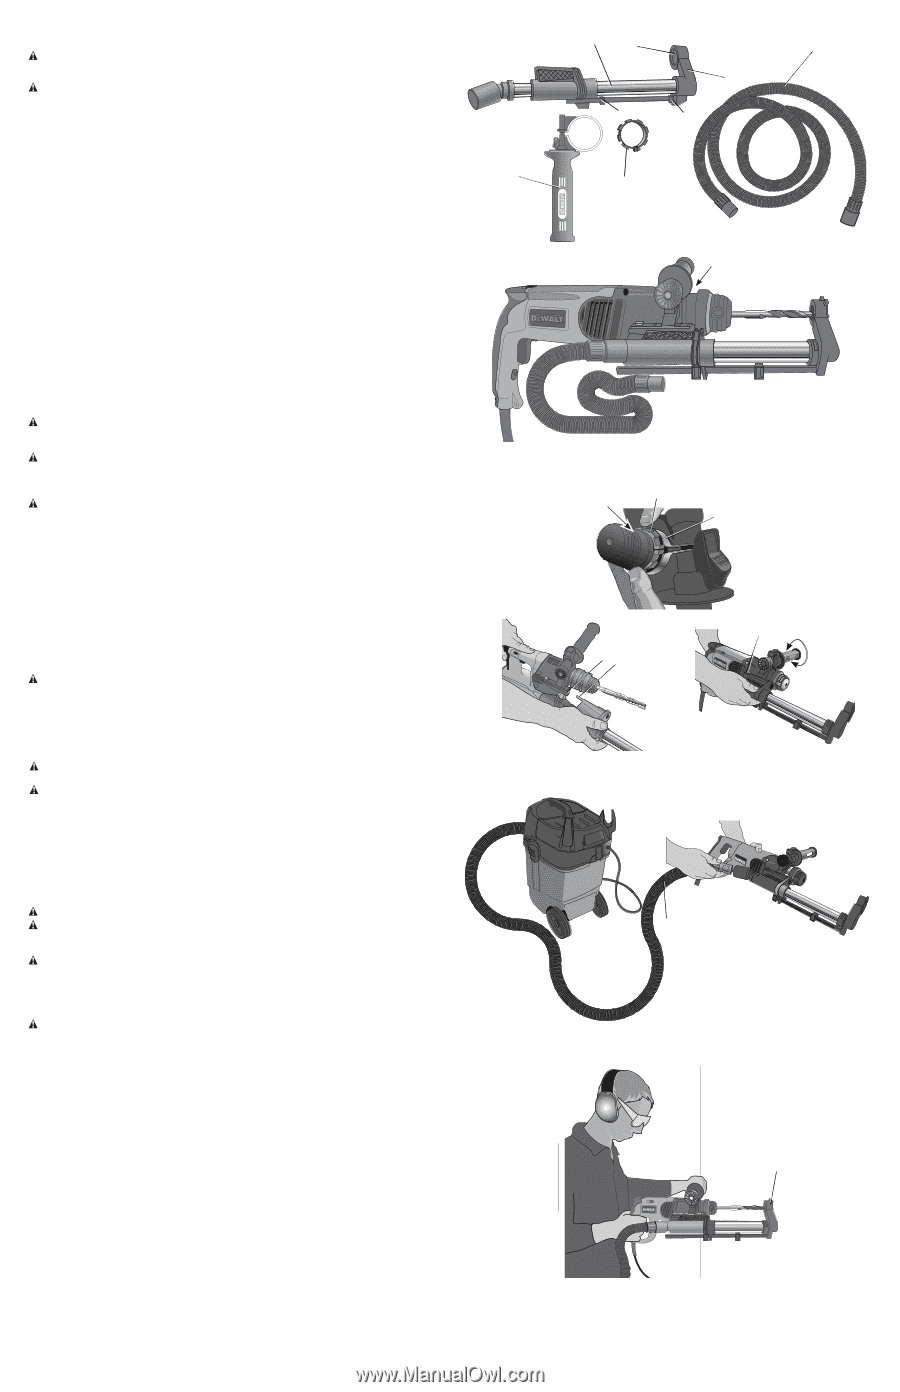
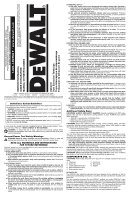
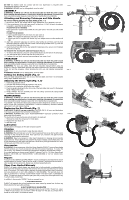
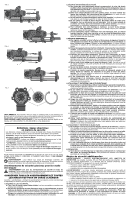
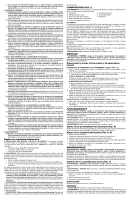
DO NOT let children come into contact with the tool. Supervision is required when inexperienced operators use this tool. WARNING: DO NOT use for drilling plastic, wood or metal. ASSEMBLY WARNING: ALWAYS turn off tool and disconnect the tool from the power source before making any adjustments or removing or installing attachments or accessories. Such preventative safety measures reduce the risk of starting the tool accidentally. Attaching and Removing Telescope and Side Handle TO ATTACH THE TELESCOPE AND SIDE HANDLE (FIG. 1-3) 1. Remove the drill bit, side handle and the depth adjustment rod, if attached to the tool. 2. If the circumference of the tool's gear case (I) is less than 1-11/16" (43 mm), the adapter is needed to assemble the side handle. IF ADAPTER IS NOT NEEDED Place open end of supplied side handle (G) onto gear case of tool and turn side handle until tight. IF ADAPTER IS NEEDED a. Open supplied adapter (H) and close onto gear case (I). NOTE: The adapter will slide back and forth on the tool. b. Place open end of supplied side handle (G) onto adapter and turn side handle until tight. 3. Align dust extraction telescope (A) with the side handle (G) and then push the dust extraction telescope against the side handle until the spring-loaded button (J) locks the dust extraction telescope into place. 4. Insert the dust hose (B) into the dust extraction telescope and a vacuum (not included) as shown in Figure 3. TO REMOVE THE TELESCOPE AND SIDE HANDLE (FIG. 2) 1. To remove the telescope, press the spring-loaded button (J) and remove the telescope. 2. Turn side handle (G) to loosen and slide from nose of tool. 3. If adapter (H) was used, open and remove adapter from nose of tool. OPERATION WARNING: ALWAYS turn off tool and disconnect the tool from the power source before making any adjustments or removing or installing attachments or accessories. Such preventative safety measures reduce the risk of starting the tool accidentally. WARNING: For your own safety, read the tool instruction manual before using any accessory. Failure to heed these warnings may result in personal injury and serious damage to the tool and the accessory. When servicing this tool, use only identical replacement parts. WARNING: DO NOT use for drilling plastic, wood or metal. Setting the Drilling Depth (Fig. 5) Press the depth adjustment button (D) on top of the front slider and move it to the desired drilling depth. Release the button. Adjusting the Drill Length (Fig. 4, 6) 1. Insert the appropriate drill bit. 2. Hold the dust extraction head (E) against a wall (fig. 4). 3. Push the tool to make the drill bit touch the surface. 4. Press the length adjustment button (C) on top of the back slider and move it to the desired length. Release the button. 5. Gently withdraw the tool assembly from the wall, taking care that the spring-loaded mechanism does not release. MAINTENANCE WARNING: ALWAYS turn off tool and disconnect the tool from the power source before making any adjustments or removing or installing attachments or accessories. Such preventative safety measures reduce the risk of starting the tool accidentally. Your DEWALT dust extraction telescoping system has been designed to operate over a long period of time with a minimum of maintenance. Continuous satisfactory operation depends upon proper care and regular cleaning. Replacing the Dust Brush (Fig. 7) WARNING: ALWAYS use eye protection (CAN/CSA Z94.3). All users and bystanders must wear eye protection that conforms to ANSI Z87.1. WARNING: ALWAYS use proper NIOSH/OSHA/MSHA respiratory protection when performing this procedure. The dust brush will wear during use and will need to be replaced. 1. Remove the circlip (K) using a pair of circlip pliers. 2. Replace the dust brush (F). 3. Refit the circlip. Lubrication No lubrication is necessary for the dust extraction system. Cleaning WARNING: Do not use a brush to clean the dust collector. WARNING: Blow dirt and dust out of the main housing with dry air as often as dirt is seen collecting in and around the air vents. Wear approved eye protection and approved dust mask when performing this procedure. WARNING: Never use solvents or other harsh chemicals for cleaning the non-metallic parts of the tool. These chemicals may weaken the plastic materials used in these parts. Use a cloth dampened only with water and mild soap. Never let any liquid get inside the tool; never immerse any part of the tool into a liquid. Accessories WARNING: Since accessories, other than those offered by DEWALT, have not been tested with this product, use of such accessories with this tool could be hazardous. To reduce the risk of injury, only DEWALT recommended accessories should be used with this product. If you need assistance, please contact DEWALT Industrial Tool Co., 701 East Joppa Road, Baltimore, MD 21286, call 1-800-4-DEWALT (1-800-433-9258) or visit our website www. dewalt.com. Repairs To assure product SAFETY and RELIABILITY, repairs, maintenance and adjustments should be performed by a DEWALT factory service center, a DEWALT authorized service center or other qualified service personnel. Always use identical replacement parts. Three Year Limited Warranty DEWALT will repair, without charge, any defects due to faulty materials or workmanship for three years from the date of purchase. This warranty does not cover part failure due to normal wear or tool abuse. For further detail of warranty coverage and warranty repair information, visit www.dewalt.com or call 1-800-4-DEWALT (1-800-433-9258). This warranty does not apply to accessories or damage caused where repairs have been made or attempted by others. This warranty gives you specific legal rights and you may have other rights which vary in certain states or provinces. In addition to the warranty, DEWALT tools are covered by our: 1 YEAR FREE SERVICE DEWALT will maintain the tool and replace worn parts caused by normal use, for free, any time during the first year after purchase. 90 DAY MONEY BACK GUARANTEE If you are not completely satisfied with the performance of your DEWALT Power Tool, Laser, or Nailer for any reason, you can return it within 90 days from the date of purchase with a receipt for a full refund - no questions asked. FIG. 1 G FIG. 2 FIG. 3 A F B E C D H I H I G J GA B FIG. 4 E
-
 1
1 -
 2
2 -
 3
3 -
 4
4 -
 5
5 -
 6
6
 |
 |