Dewalt D55153 Instruction Manual - Page 18
Possible Cause, Possible Solution - reset button
 |
View all Dewalt D55153 manuals
Add to My Manuals
Save this manual to your list of manuals |
Page 18 highlights
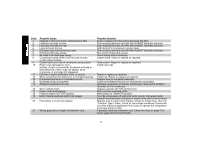
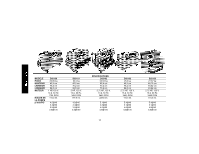
Code 1. 2. 3 4. 5. 6. 7. 8. 9. 10 11 12 13 14 15 16 17 18 19 20 21 Possible Cause Clogged or dirty inlet and/or discharge line filter. Lubricant viscosity too low. Lubricant viscosity too high. Lubricant level too low. Detergent type lubricant being used. Extremely light duty cycles. Air leaks in air discharge piping. Compressor pump check valve is loose, broken, or has carbon buildup. Carbon build up on top of compressor pump piston. Piston rings damaged or worn (broken, rough, or scratched). Excessive end gap or side clearance. Piston rings not seated, stuck in grooves, or end gaps not staggered. Cylinder or piston scratched, worn, or scored. Worn connecting rod, piston pin, or crankpin bearings. Crankshaft seal worn or crankshaft scored. Extremely dusty atmosphere. Ambient temperature too low. Worn cylinder finish. Power cord not plugged in. Pressure switch is in OFF position. Motor thermal overload switch has tripped. Fuse blown or circuit has tripped. Wrong gage wire or length of extension cord. Possible Solution Clean or replace air inlet and/or discharge line filter. Drain existing lubricant and refill with DEWALT Synthetic lubricant. Drain existing lubricant and refill with DEWALT Synthetic lubricant. Add lubricant to crankcase to proper level. Drain existing lubricant and refill with DEWALT Synthetic lubricant. Run unit for longer duty cycles. Check tubing and connections. Inspect valve. Clean or replace as required. Clean piston. Repair or replace as required. Install new rings. Repair or replace as required. Inspect all. Repair or replace as required.. Replace seal or crankshaft assembly. Install more effective filtration or relocate the compressor. Relocate compressor to warmer environment. Ensure that DEWALT Synthetic oil is in crankcase. Deglaze cylinder with 180 grit flex-hone Plug cord into grounded outlet. Move switch to ON/AUTO position. Turn the compressor off, wait until motor is cool, then press motor thermal overload button (located on motor) firmly until a click is heard. Replace fuse or reset circuit breaker. Check for proper fuse. Use only "Fusetron" type T fuses. Check for low voltage conditions. Disconnect any other electrical appliances from circuit or operate the compressor on its own branch circuit. If possible, eliminate extension cord. Check the chart on page 7 for proper gage wire and cord length. 12
-
 1
1 -
2
-
3
-
4
-
5
-
6
-
7
-
8
-
9
-
10
-
11
-
12
-
 13
13 -
 14
14 -
 15
15 -
 16
16 -
 17
17 -
 18
18 -
 19
19 -
 20
20 -
 21
21 -
 22
22 -
 23
23 -
24
-
25
-
26
-
27
-
28
-
29
-
30
-
31
-
32
-
33
-
34
-
35
-
36
-
37
-
38
-
39
-
40
-
41
-
42
-
43
-
44
-
45
-
46
-
47
-
48
-
49
-
50
-
51
-
52
-
53
-
54
 |
 |
