Dewalt DC618K Instruction Manual - Page 6
Indicator Light Operation - cordless nailer
 |
View all Dewalt DC618K manuals
Add to My Manuals
Save this manual to your list of manuals |
Page 6 highlights
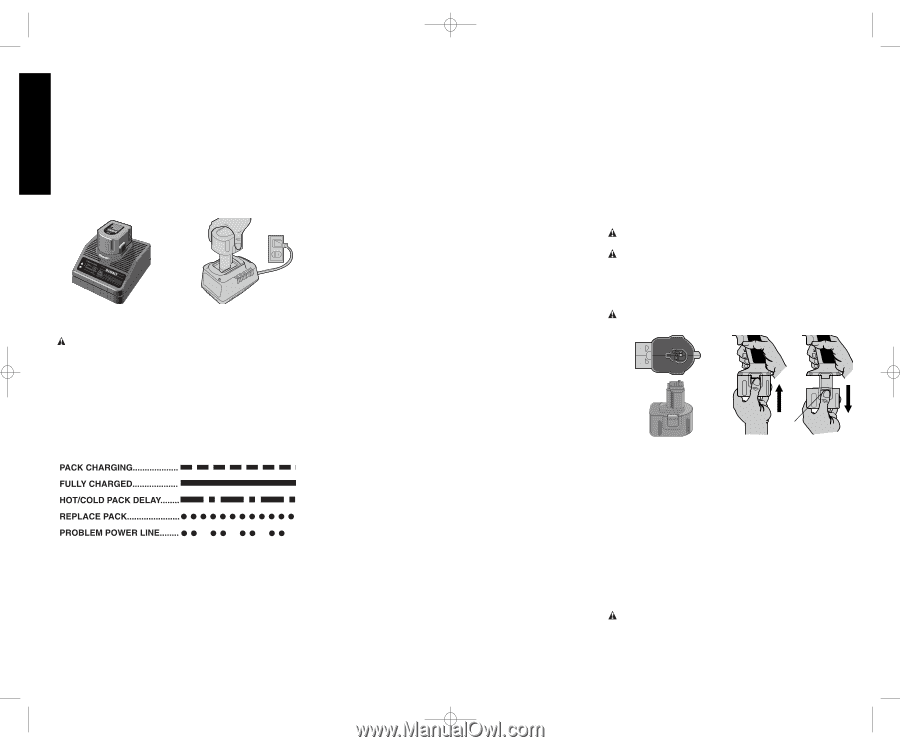
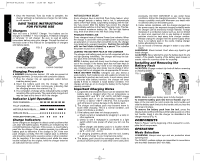
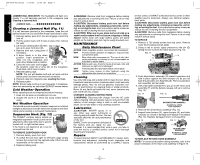
644429-00,DC612 7/10/06 11:56 AM Page 4 English 4. Once the Automatic Tune Up mode is complete, the charger will begin a maintenance charge; the red indicator will remain lit. SAVE THESE INSTRUCTIONS FOR FUTURE USE Chargers Your tool uses a DEWALT Charger. Your battery can be charged in DEWALT 1 Hour Chargers, 15 Minute Chargers or Vehicular 12 volt charger. Be sure to read all safety instructions before using your charger. Consult the chart on the back cover of this manual for compatibility of chargers and battery packs. FIG. 2 15 MINUTE CHARGER 1 HOUR CHARGER Charging Procedure DANGER: Electrocution hazard. 120 volts are present at charging terminals. Do not probe with conductive objects. 1. Plug the charger into an appropriate outlet before inserting battery pack. 2. Insert the battery pack into the charger. The red (charging) light will blink continuously indicating that the charging process has started (Fig. 2). 3. The completion of charge will be indicated by the red light remaining ON continuously. The pack is fully charged and may be used at this time or left in the charger. Indicator Light Operation Charge Indicators Some chargers are designed to detect certain problems that can arise with battery packs. Problems are indicated by the red light flashing at a fast rate. If this occurs, re-insert battery pack into the charger. If the problem persists, try a different battery pack to determine if the charger is OK. If the new pack charges correctly, then the original pack is defective and should be returned to a service center or other collection site for recycling. If the new battery pack elicits the same trouble indication as the original, have the charger tested at an authorized service center. HOT/COLD PACK DELAY Some chargers have a Hot/Cold Pack Delay feature: when the charger detects a battery that is hot, it automatically starts a Hot Pack Delay, suspending charging until the battery has cooled. After the battery has cooled, the charger automatically switches to the Pack Charging mode. This feature ensures maximum battery life. The red light flashes long, then short while in the Hot Pack Delay mode. PROBLEM POWER LINE Some chargers have a Problem Power Line indicator. When the charger is used with some portable power sources such as generators or sources that convert DC to AC, the charger may temporarily suspend operation, flashing the red light with two fast blinks followed by a pause. This indicates the power source is out of limits. LEAVING THE BATTERY PACK IN THE CHARGER The charger and battery pack can be left connected with the red light glowing indefinitely. The charger will keep the battery pack fresh and fully charged. NOTE: A battery pack will slowly lose its charge when kept out of the charger. If the battery pack has not been kept on maintenance charge, it may need to be recharged before use. A battery pack may also slowly lose its charge if left in a charger that is not plugged into an appropriate AC source. WEAK BATTERY PACKS: Chargers can also detect a weak battery. Such batteries are still usable but should not be expected to perform as much work. In such cases, about 10 seconds after battery insertion, the charger will beep rapidly 8 times to indicate a weak battery condition. The charger will then go on to charge the battery to the highest capacity possible. Important Charging Notes 1. Longest life and best performance can be obtained if the battery pack is charged when the air temperature is between 65°F and 75°F (18°- 24°C). DO NOT charge the battery pack in an air temperature below +40°F (+4.5°C), or above +105°F (+40.5°C). This is important and will prevent serious damage to the battery pack. 2. The charger and battery pack may become warm to touch while charging. This is a normal condition, and does not indicate a problem. 3. If the battery pack does not charge properly: a. Check current at receptacle by plugging in a lamp or other appliance b. Check to see if receptacle is connected to a light switch which turns power off when you turn out the lights. c. Move charger and battery pack to a location where the surrounding air temperature is approximately 65°F - 75°F (18° - 24°C). d. If charging problems persist, take the tool, battery pack and charger to your local service center. 4. The battery pack should be recharged when it fails to produce sufficient power on jobs which were easily done 4 previously. DO NOT CONTINUE to use under these conditions. Follow the charging procedure. You may also charge a partially used pack whenever you desire with no adverse affect on the battery pack. 5. Under certain conditions, with the charger plugged into the power supply, the exposed charging contacts inside the charger can be shorted by foreign material. Foreign materials of a conductive nature such as, but not limited to, steel wool, aluminum foil, or any buildup of metallic particles should be kept away from charger cavities. Always unplug the charger from the power supply when there is no battery pack in the cavity. Unplug charger before attempting to clean. 6. Do not freeze or immerse charger in water or any other liquid. WARNING: Shock hazard. Don't allow any liquid to get inside charger. CAUTION: Never attempt to open the battery pack for any reason. If the plastic housing of the battery pack breaks or cracks, return to a service center for recycling. Installing and Removing the Battery Pack CAUTION: Engage contact trip lock-off before removing or installing battery. FIG. 3 FIG. 4 M NOTE: Make sure your battery pack is fully charged. To install the battery pack into the tool handle, align the base of the tool with the notch inside the tool's handle and slide the battery pack firmly into the handle until you hear the lock snap into place. To remove the battery pack from the tool, press the release buttons (M) and firmly pull the battery pack out of the tool handle. Insert it into the charger as described in the charger manual (Fig. 4). COMPONENTS Refer to Figure 1 at the beginning of this manual for a complete list of components. OPERATION Mode Selection WARNING: Always wear eye and ear protection when operating tool. The DEWALT cordless nailers are assembled in accordance with the ANSI Standard SNT-101-2002.
-
 1
1 -
 2
2 -
 3
3 -
 4
4 -
 5
5 -
 6
6 -
 7
7 -
 8
8 -
 9
9 -
 10
10 -
 11
11 -
 12
12 -
13
-
14
-
15
-
16
-
17
-
18
-
19
-
20
-
21
-
22
-
23
-
24
-
25
-
26
-
27
-
28
-
29
-
30
-
31
-
32
-
33
-
34
-
35
-
36
 |
 |