Dewalt DCF620M2 Instruction Manual - Page 14
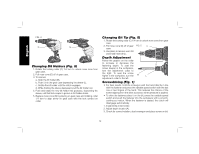
Changing Bit Holders Fig. 5, Changing Bit Tip Fig. 5, Depth Adjustment, Screwdriving Fig. 1
 |
View all Dewalt DCF620M2 manuals
Add to My Manuals
Save this manual to your list of manuals |
Page 14 highlights
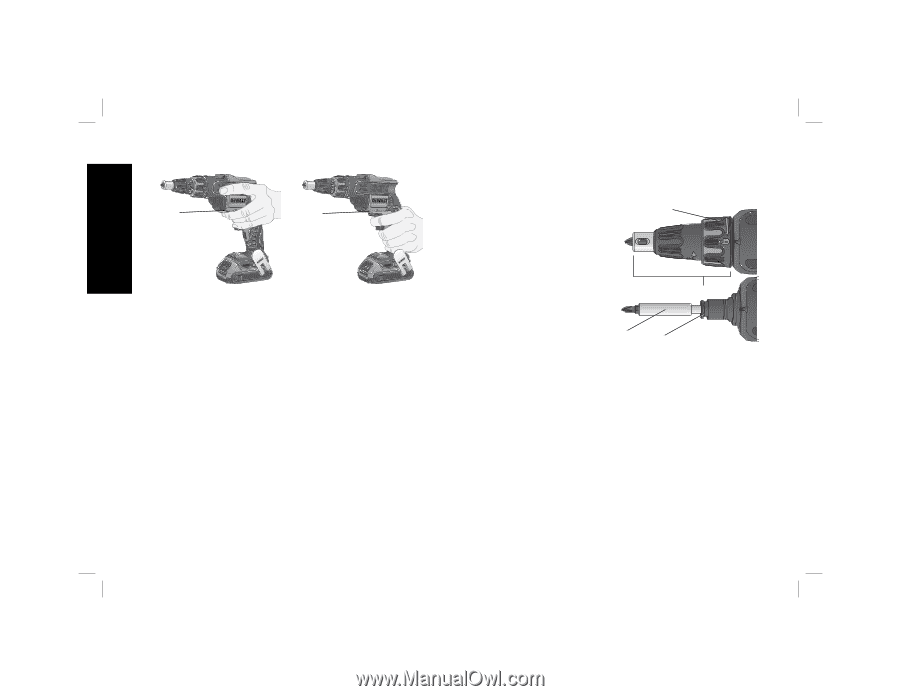
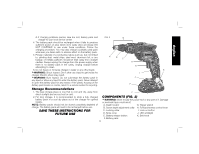
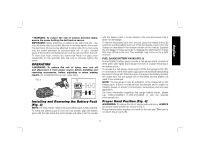
English FIG. 4 N N Changing Bit Holders (Fig. 5) 1. Rotate the locking collar (C) 1/4 turn to unlock nose cone from gear case. 2. Pull nose cone (D) off of gear case. 3. To remove: a. Grab the bit holder (M). b. Push it into the gear case depressing the sleeve (L). c. Rotate the bit holder until the clutch engages. d. While holding the sleeve depressed, pull the bit holder out. 4. Push and rotate the new bit holder into gearcase, depressing the sleeve, until ball lock snaps in groove in bit holder shank. 5. Replace nose cone (D) by placing on gear case and rotating collar 1/4 turn to align arrow on gear case with the lock symbol on collar. Changing Bit Tip (Fig. 5) 1. Rotate the locking collar (C) 1/4 turn to unlock nose cone from gear case. 2. Pull nose cone (D) off of gear FIG. 5 C case. 3. Use pliers to remove worn bit and install new bit tip. Depth Adjustment Follow the graphic on the collar to increase or decrease the fastening depth. To seat the D screw deeper in the workpiece, turn the adjustment collar to the right. To seat the screw higher in the workpiece, turn the M L adjustment collar to the left. Screwdriving (Fig. 1) • For best results, hold the screwgun with the hand directly in line with the fastener and press the variable speed switch with the last one or two fingers of the hand. This reduces the chance of the screw slipping from the drive accessory when pressure is applied. • To drive the fastener, place it on the bit, press the variable speed switch and push the fastener into the workpiece with a smooth, continuous motion. When the fastener is seated, the clutch will disengage automatically. 1. Install bit tip in bit holder. 2. Adjust depth locator (A). 3. Check for correct rotation, start screwgun and place screw on bit. 12
-
 1
1 -
2
-
3
-
4
-
5
-
6
-
7
-
8
-
 9
9 -
 10
10 -
 11
11 -
 12
12 -
 13
13 -
 14
14 -
 15
15 -
 16
16 -
 17
17 -
 18
18 -
 19
19 -
20
-
21
-
22
-
23
-
24
-
25
-
26
-
27
-
28
-
29
-
30
-
31
-
32
-
33
-
34
-
35
-
36
-
37
-
38
-
39
-
40
-
41
-
42
-
43
-
44
-
45
-
46
-
47
-
48
-
49
-
50
-
51
-
52
 |
 |