Dewalt DCR018 Instruction Manual - Page 12
Device Storage Box Fig. 7, Important Radio Notes - charge batteries
 |
View all Dewalt DCR018 manuals
Add to My Manuals
Save this manual to your list of manuals |
Page 12 highlights
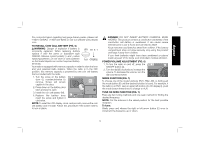
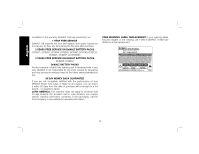
English To seek: Press and hold the right or left arrow button (E) to increase or decrease frequency until a radio station with clear reception is found. Either arrow button may be pressed and held to continuously scroll through the frequency range then released to stop at the next available frequency. The seek function is available in AM and FM modes. TO PROGRAM THE CLOCK (FIG. 1) 1. Turn power on by pressing the ON/OFF button (A). 2. Press and hold the clock button (G) until time displayed in the LCD display (I) begins flashing. 3. Press the left arrow button repeatedly to increment the hour of the displayed time or press and hold the button to increment continuously. Use the right arrow button to adjust the minutes in the same manner. NOTE: If you do not press a button within 5 seconds, the clock programming feature will automatically return to the previous setting. 4. Once the time is set, press the clock button to stop the time displayed from flashing. TO PROGRAM THE MEMORY STATION PRESETS (FIG. 1) Ten FM and five AM radio stations may be independently programmed into the radio's memory. Once programmed, the memory button can be used to quickly change to the desired preset station. 1. Turn on radio by pressing the ON/OFF button (A). 2. Set the radio to desired station Refer to Tune or Seek Function. 3. Press and hold the preset button (H) until the memory number begins to flash in the LCD display (I). 4. With the memory number flashing, use the arrow buttons to select the desired memory number. 5. Once the desired memory number is displayed, press and hold the preset button until the flashing stops. The preset is now saved. 6. Repeat steps 2 through 5 to preset additional stations to memory. Device Storage Box (Fig. 7) The radio's device storage box (N) can store and help protect some smart phones or other portable audio devices from job site dirt and debris. PLAYING AUDIO THROUGH AN EXTERNAL DEVICE To play your device through the radio's speakers, connect it to the auxiliary port (O) using a 3.5 mm auxiliary audio cable and set the mode to AUX. Refer to Mode Function. CHARGING/POWERING A USB DEVICE The USB power port (P) charges/powers FIG. 7 O most devices that can accept power through a USB connection only when the radio is plugged into an AC receptacle. NOTE: When unplugged, the radio will N run up to 10 hours on a fully-charged, premium 20 V Max* Li-Ion battery. Using batteries of lower voltage and amp hours P will yield less run time. Important Radio Notes 1. Reception will vary depending on the radio's location and strength of the transmitted signal. 2. Running the radio while connected to certain generators may cause background noise. 10
-
 1
1 -
2
-
3
-
4
-
5
-
6
-
 7
7 -
 8
8 -
 9
9 -
 10
10 -
 11
11 -
 12
12 -
 13
13 -
 14
14 -
 15
15 -
 16
16 -
 17
17 -
18
-
19
-
20
-
21
-
22
-
23
-
24
-
25
-
26
-
27
-
28
-
29
-
30
-
31
-
32
-
33
-
34
-
35
-
36
-
37
-
38
-
39
-
40
-
41
-
42
-
43
-
44
 |
 |