Dewalt DW124 Instruction Manual - Page 7
Assembling Bail Handle, Shifting to the Desired Speed, Switches, Operation - chuck key
 |
View all Dewalt DW124 manuals
Add to My Manuals
Save this manual to your list of manuals |
Page 7 highlights
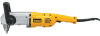
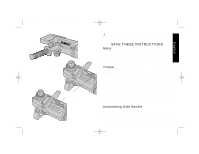
DW124/384086-01 11/15/02 12:35 PM Page 4 English Assembling Bail Handle A bail handle is provided for carrying the tool and for use as a hand hold when drilling where space limitations prevent the use of the side handle. Assemble the bail handle in either of the positions shown in figure 3. When changing the location of the bail handle from one position to the other, it is necessary to remove completely the two bolts securing it. These bolts can be loosened or tightened with a quarter or other suitable coin as shown in Figure 4. Turn the handle around (1/2 turn) and reinstall as desired. Always operate this tool with the bail handle installed. Shifting to the Desired Speed To select high speed (1200 RPM) pull up on the speed selector and slide it to the position shown in Figure 5. Make sure that when you release the selector, it snaps down into the detent in the housing. To select low speed (300 RPM) pull up on the speed selector and slide it to the position shown in Figure 6. Make sure that when you release the selector, it snaps down into the detent in the housing. NOTE: It may be necessary to rotate the chuck slightly by hand when shifting speeds. Never change speeds when the drill is running or coasting. Switches Depressing the trigger switch turns the tool "ON," releasing the trigger switch turns the tool "OFF." There is a slide switch built into the handle directly behind the trigger switch for operating in reverse. For drilling, this switch is put in the "F" position and for reversing operations, it is pushed to the "R" position. NOTE: The switch provided is a common part for use on several other tools. Ignore the "HI/LO" markings for this drill. A built in mechanical interlock prevents operation of the slide switch unless the trigger is released. Avoid reversing the drill's direction while it is still coasting to a stop. Operation CAUTION: Always unplug the tool when attaching or changing bits or accessories. 1. Open the chuck jaws by turning collar with fingers and insert bit fully into the chuck. Tighten chuck collar by hand. Place chuck key in each of the three holes, and tighten in clockwise direction. It's important to tighten chuck with all three holes. To release bit, turn chuck key counter clockwise in just one hole, then loosen chuck by hand. 2. Use sharp drill bits only. For WOOD, use twist drill bits, spade bits, power auger bits, or hole saws. For METAL, use high-speed steel twist drill bits or hole saws. For MASONRY, such as brick, cement, cinder block etc., use carbide-tipped bits. 3. Be sure the material to be drilled is anchored or clamped firmly. If drilling thin material, use a wood "back-up" block to prevent damage to the material. 4. Always apply pressure in a straight line with the bit. Use enough pressure to keep drill biting, but do not push hard enough to stall the motor or deflect the bit. 5. Hold drill firmly to control the twisting action of the drill. Use side handle. CAUTION: Drill may stall if overloaded causing a sudden twist. Always expect the stall. Grip the drill firmly to control the twisting action and avoid injury. 6. IF DRILL STALLS, it is usually because it is being overloaded or improperly used. RELEASE TRIGGER IMMEDIATELY, remove drill bit from work, and determine cause of stalling. DO NOT CLICK TRIGGER OFF AND ON IN AN ATTEMPT TO START A STALLED DRILL - THIS CAN DAMAGE THE DRILL. 7. To minimize stalling on breaking through the material, reduce pressure on drill and ease the bit through the last fractional part of the hole. 8. Keep the motor running when pulling the bit back out of a drilled hole. This will help prevent jamming. 4
-
 1
1 -
 2
2 -
 3
3 -
 4
4 -
 5
5 -
 6
6 -
 7
7 -
 8
8 -
 9
9 -
 10
10 -
 11
11 -
 12
12 -
13
-
14
-
15
-
16
-
17
-
18
-
19
-
20
-
21
-
22
-
23
-
24
-
25
-
26
 |
 |
