Dewalt DW7350 Instruction Manual - Page 5
To Move Planer Stand, MAINTENANCE, Cleaning, Accessories, Repairs, Register Online, Three Year - assembly
 |
View all Dewalt DW7350 manuals
Add to My Manuals
Save this manual to your list of manuals |
Page 5 highlights
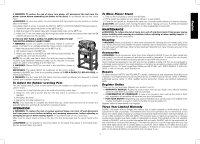
English WARNING: To reduce the risk of injury, turn planer off, disconnect the tool from the power source before assembling the planer to the stand. An accidental start-up can cause injury. WARNING: For your own safety, it is recommended that two people carry this machine or serious injury could result. Your planer stand is set up to accept the DW733, DW734 or DW735 DEWALT thickness planers. 1. Carefully lift and place the planer on the MDF top (L). 2. Align the holes in the planer base with corresponding holes on the MDF top. 3. Insert four 75 mm hex head bolts (N) through the planer and base and secure them with the flat washers (S) and nuts (T) provided. IF YOU DO NOT HAVE A DEWALT PLANER, BUT WISH TO USE FIG. 3 THE DW7350 MOBILE PLANER STAND: WARNING: Center your planer on the stand. Failure to center the planer could lead to an unstable assembly. Serious injury could result. 1. Mark the placement of the holes on the MDF top (L). 2. Drill marked holes in the MDF top. 3. Attach your planer to the MDF top with the hex head bolts (N), flat washers (S), and nuts (T) provided. NOTE: Do not drill more than 4 holes. One bolt per corner is sufficient. Properly sized hardware (obtained locally) may be required to securely attach the planer (if not DEWALT) to the MDF top. WARNING: Planers MUST be mounted in the orientation shown in Figure 3. IMPORTANT: The planer MUST be positioned so the tool is bolted squarely to the MDF top. If this is not possible, please call 1-800-4-DEWALT (1-800-433-9258) for technical assistance. WARNING: Any tool used with this stand must be properly positioned and secured to ensure stability and to prevent inadvertent tipping. To Adjust the Rubber Leveling Feet The two rubber feet (F) of the mobile planer stand are installed for additional support on slightly uneven floors. 1. Loosen the 2 nuts that hold one of the rubber feet of the mobile base. 2. Grasp the nuts with a wrench and turn the foot until it is extended or retracted to the level required. 3. Re-tighten the bolts. 4. Repeat for the other rubber foot. NOTE: Once assembly is complete and before first use, check each bolt and nut to ensure it is properly tightened, and that all mechanisms operate properly. OPERATION WARNING: To reduce the risk of serious personal injury, turn tool off and disconnect tool from power source before installing and removing accessories, before adjusting or changing set-ups or when making repairs. An accidental start-up can cause injury. Make sure the planer stand is firmly on the floor, the foot pedal down and the wheel raised before use. WARNING: Do not attempt to move the planer on the stand if the planer is not bolted down. Serious personal injury may result. To Move Planer Stand 1. Step on the foot pedal to unlock and lift stand. 2. Firmly grasp the handles on your planer. Move to a new location. 3. Push the foot pedal up, dropping the base into a locked position before you resume planing. CAUTION: Use caution when moving the planer stand. Tipping can occur if wheels are stopped abruptly by encountering debris on the floor or other irregularities in travel path. MAINTENANCE WARNING: To reduce the risk of injury, turn unit off and disconnect it from power source before installing and removing accessories, before adjusting or when making repairs. An accidental start-up can cause injury. Cleaning WARNING: Never use solvents or other harsh chemicals for cleaning the non-metallic parts of the tool. These chemicals may weaken the plastic materials used in these parts. Use a cloth dampened only with water and mild soap. Never let any liquid get inside the tool; never immerse any part of the tool into a liquid. Accessories WARNING: Since accessories, other than those offered by DEWALT, have not been tested with this product, use of such accessories with this tool could be hazardous. To reduce the risk of injury, only DEWALT recommended accessories should be used with this product. Recommended accessories for use with your tool are available at extra cost from your local dealer or authorized service center. If you need assistance in locating any accessory, please contact DEWALT Industrial Tool Co., 701 East Joppa Road, Baltimore, MD 21286, call 1-800-4-DEWALT (1-800-4339258) or visit our website: www.dewalt.com. Repairs To assure product SAFETY and RELIABILITY, repairs, maintenance and adjustment (including brush inspection and replacement) should be performed by a DEWALT factory service center, a DEWALT authorized service center or other qualified service personnel. Always use identical replacement parts. Register Online Thank you for your purchase. Register your product now for: • WARRANTY SERVICE: Registering your product will help you obtain more efficient warranty service in case there is a problem with your product. • CONFIRMATION OF OWNERSHIP: In case of an insurance loss, such as fire, flood or theft, your registration of ownership will serve as your proof of purchase. • FOR YOUR SAFETY: Registering your product will allow us to contact you in the unlikely event a safety notification is required under the Federal Consumer Safety Act. Register online at www.dewalt.com/register. Three Year Limited Warranty DEWALT will repair, without charge, any defects due to faulty materials or workmanship for three years from the date of purchase. This warranty does not cover part failure due to normal wear or tool abuse. For further detail of warranty coverage and warranty repair information, visit www.dewalt.com or call 1-800-4-DEWALT (1-800-433-9258). This warranty does not apply to accessories or damage caused where repairs have been made or attempted by others. This warranty is the only warranty offered by DEWALT, and any implied warranties shall not apply. DEWALT will not be responsible for any incidental or consequential damages. This warranty gives you specific legal rights and you may have other rights which vary in certain states or provinces. Some states do not allow the exclusion or limitation of incidental or consequential damages, or limitations on how long an implied warranty lasts, so the above limitations or exclusions may not apply to you. 3
-
 1
1 -
 2
2 -
 3
3 -
 4
4 -
 5
5 -
 6
6 -
 7
7 -
 8
8 -
 9
9 -
 10
10 -
 11
11 -
12
-
13
-
14
-
15
-
16
 |
 |
