Dewalt DWF83PL Instruction Manual - Page 10
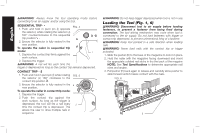
Loading the Tool Fig. 1, 6 - new
 |
View all Dewalt DWF83PL manuals
Add to My Manuals
Save this manual to your list of manuals |
Page 10 highlights
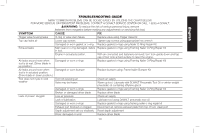
English WARNING: Always know the tool operating mode before connecting to an air supply and/or using the tool. SEQUENTIAL TRIP- FIG. 4 1. Push and hold in pivot pin (I) opposite the selector, while rotating the selector (J) 180° counterclockwise to the sequential trip position . 2. Ensure the selector is fully seated in the new position. To operate the nailer in sequential trip mode: I 1. Depress the contact trip firmly against the work surface. 2. Depress the trigger. WARNING: A nail will fire each time the trigger is depressed as long as the contact trip remains depressed. CONTACT TRIP - 1. Push and hold in pivot pin (I) while rotating the selector (J) 180° clockwise to the contact trip position . 2. Ensure the selector is fully seated in the new position. To operate the nailer in contact trip mode: 1. Depress the trigger. 2. Push the contact trip against the work surface. As long as the trigger is depressed, the tool will fire a nail every time the contact trip is depressed. This allows the user to drive multiple nails in sequence. FIG. 5 J WARNING: Do not keep trigger depressed when tool is not in use. Loading the Tool (Fig. 1, 6) WARNING: Disconnect tool to air supply before loading fasteners, to prevent a fastener from being fired during connection. The tool driving mechanism may cycle when tool is connected to the air supply. Do not load fasteners with trigger or contact trip depressed, to prevent unintentional firing of a fastener. WARNING: Keep tool pointed in a safe direction when loading nails. WARNING: Never load nails with the contact trip or trigger activated. 1. Slide the pusher (E) to the base of the magazine to lock it in place. 2. Hold the nailer with the magazine facing downward and insert the appropiate collated nail sticks in tho the back of the magzine NOTE: See Tool Specifications to determine appropriate nail sizes and angles. 3. Pull pusher (E) back again to release and carefully allow pusher to slide forward until it makes contact with the nails. FIG. 6 E 8
-
 1
1 -
2
-
3
-
4
-
 5
5 -
 6
6 -
 7
7 -
 8
8 -
 9
9 -
 10
10 -
 11
11 -
 12
12 -
 13
13 -
 14
14 -
 15
15 -
16
-
17
-
18
-
19
-
20
-
21
-
22
-
23
-
24
-
25
-
26
-
27
-
28
-
29
-
30
-
31
-
32
-
33
-
34
-
35
-
36
-
37
-
38
-
39
-
40
-
41
-
42
-
43
-
44
-
45
-
46
-
47
-
48
-
49
-
50
-
51
-
52
 |
 |
