Dewalt DWMT70779 Instruction Manual - Page 8
Operating Procedures
 |
View all Dewalt DWMT70779 manuals
Add to My Manuals
Save this manual to your list of manuals |
Page 8 highlights
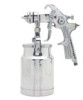
English OPERATING PROCEDURES WARNING: Do not attempt to unclog (back flush) the spray gun by squeezing the trigger while holding your finger in front of the fluid nozzle. CAUTION: Pressure may vary according to viscosity of material used. Maximum working pressure of the gun is 40 PSI. Do not exceed pressure limit of gun or any other component in system! CAUTION: Prior to daily operation, make certain that all connections and fittings are secure. Check hose and all connections for a weak or worn condition that could render system unsafe. All replacement components such as hose or fittings must have a working pressure equal to or greater than system pressure. SIPHON FEED USE: 1. Mix material according to the manufacturer's instructions. Mixture should be smooth and easily pourable. Lumps or foreign particles should be removed by straining through a suitable paint filter. NOTE: When applying heavy bodied paints, the internal Mix Air Cap included is recommended. NOTE: If not using the siphon feed setting, see "Internal Pressure Feed" or "Remote Pressure Feed' paragraphs. 2. Fill the material cup (E) ¾" full. 3. Attach material cup (E) to the gun securely. 4. Attach air supply line to the ¼" air inlet (G). 5. To adjust the spray pattern, loosen the air cap (A) and rotate the horns (B) to achieve desired pattern. Then tighten air cap (A). 6. Turn the fluid control knob (J) clockwise until it stops, do not force it. This will shut off the fluid flow. 7. Adjust air pressure to 40 PSI at air compressor WARNING: DO NOT exceed 100 PSI. 8. Turn the air volume control knob (H) counterclockwise until the first thread is flush with the gun body. WARNING: DO NOT turn air valve control knob the or fluid control knob out until first thread is past the gun body. They are under pressure when the gun is triggered and could leave the gun with force. NOTE: Care should be exercised when handling spray gun to avoid damage to the orifice of the air cap and tip of fluid nozzle. Damage to these parts results in irregular spray patterns. 9. Depress spray gun trigger (F) and gradually turn the fluid control knob (J) counterclockwise until desired fluid flow is reached. Trigger gun quickly, one second on-off to test pattern. WARNING: NEVER point spray gun at self or any other person. Accidental discharge of material may result in serious injury. NOTE: If gun sprays too fast, decrease the air and fluid pressure. If too slow, increase the pressure. Turn fluid control knob (J) counterclockwise to increase, or clockwise to decrease, the fluid flow. Turn air volume control knob (H) counterclockwise to increase, or clockwise to decrease, the air flow. NOTE: When using the internal mix air cap, begin with the same air and fluid pressure. 8
-
 1
1 -
2
-
 3
3 -
 4
4 -
 5
5 -
 6
6 -
 7
7 -
 8
8 -
 9
9 -
 10
10 -
 11
11 -
 12
12 -
 13
13 -
14
-
15
-
16
-
17
-
18
-
19
-
20
-
21
-
22
-
23
-
24
-
25
-
26
-
27
-
28
-
29
-
30
-
31
-
32
-
33
-
34
-
35
-
36
 |
 |
