Dymo LabelManager® 420P User Guide 1 - Page 11
About the Built-In Software, About the DYMO Label™ v.8 Software, Label Maker Status - labelmanager quick start guide
 |
View all Dymo LabelManager® 420P manuals
Add to My Manuals
Save this manual to your list of manuals |
Page 11 highlights
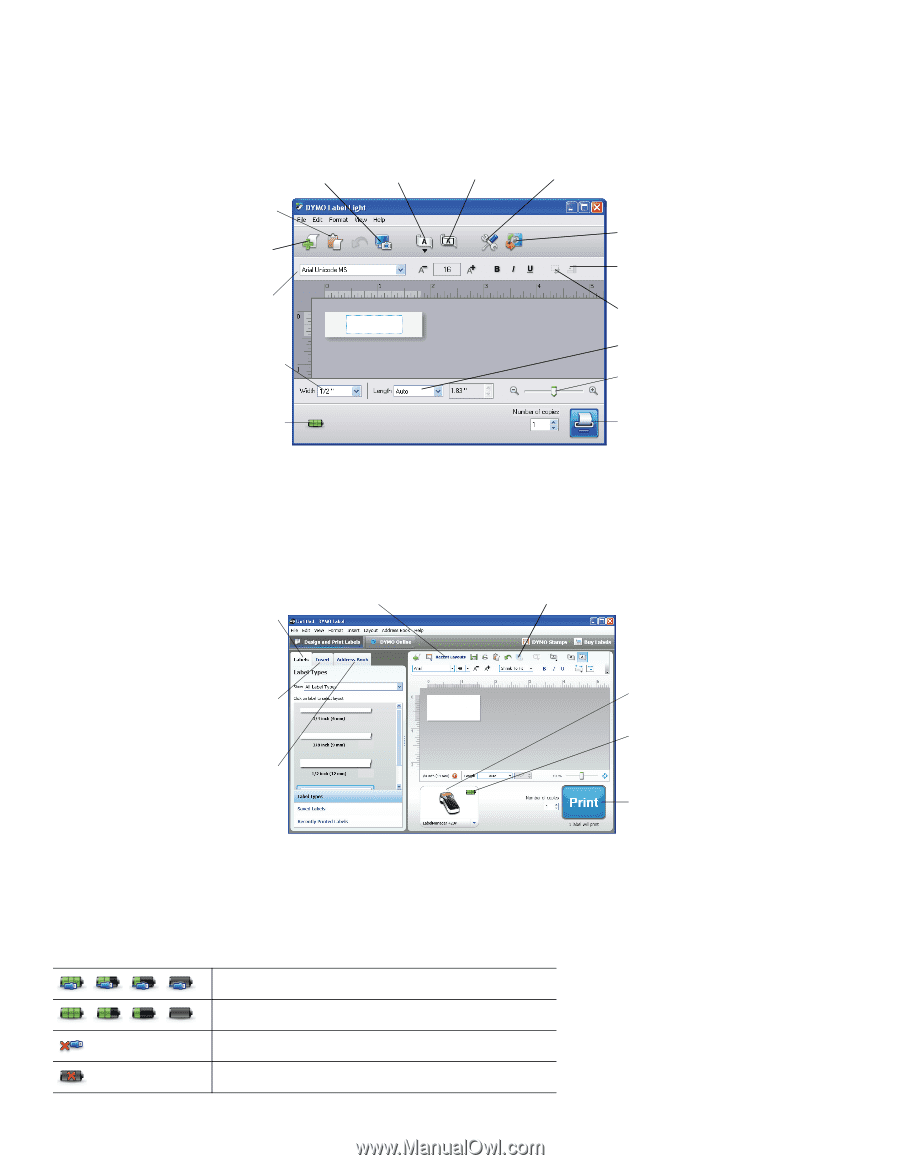
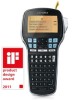
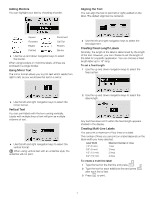
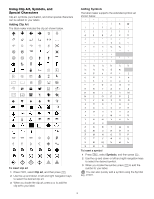
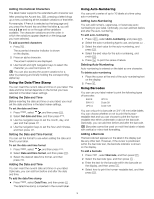
About the Built-In Software The built-in software resides on the label maker. You do not need to install additional software or drivers to use the label maker with your computer. The following figure shows some of the features available in the software. Capture an area of the screen and insert on your label. Insert text you've copied to the Clipboard. Create a new label. Format your label as you would in any text editor. Match the label width to the label cassette in the label maker. Choose to print a horizontal or vertical label. Add a border around the label. Change the language settings (Windows only) or units of measure. Start advanced DYMO Label v.8 software. Rotate images 90 degrees. Crop an image added to the label. Choose a fixed length for the label or make the label resize automatically to fit the text. Zoom the label. View the status of the label maker. Print a label. Refer to the LabelManager 420P Quick Start Guide for information about starting and using the built-in software. About the DYMO Label™ v.8 Software To take advantage of more advanced formatting features, download and install DYMO Label™ v.8 software from the DYMO Web site at www.dymo.com. The following figure shows some of the major features available in DYMO Label v.8. Visually choose your label type and apply layouts. Apply a layout to a label. Capture an area of the screen and insert on your label. Insert text, addresses, images, shapes, lines, barcodes, dates, and counters. Store your favorite addresses or other data in the Address Book; automatically insert the data on your label. Select a label maker to print your labels. View the status of the label maker. Print a label. For complete details on installing and using the DYMO Label v.8 software, refer to the LabelManager 420P Quick Start Guide and the DYMO Label online Help. Label Maker Status The label maker status is displayed in the software window. The following table describes the possible states of the label maker. Label maker is connected and battery is charging Label maker is connected and battery is not charging Label maker is not connected or is turned off Label maker is connected and there is a problem with the battery 11
-
 1
1 -
2
-
3
-
4
-
5
-
 6
6 -
 7
7 -
 8
8 -
 9
9 -
 10
10 -
 11
11 -
 12
12
 |
 |