Dymo LabelManager® 420P User Guide 1 - Page 9
Adding International Characters, Using the Date/Time Stamp, Setting the Date and Time
 |
View all Dymo LabelManager® 420P manuals
Add to My Manuals
Save this manual to your list of manuals |
Page 9 highlights
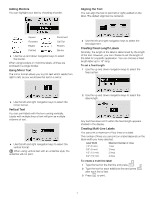
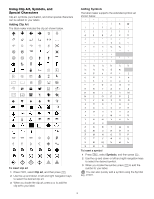
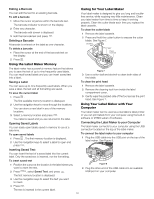
Adding International Characters The label maker supports the extended Latin character set. After pressing the Accent key, , pressing a letter brings up a menu containing all the available variations of that letter. For example, if French is selected as the language and you press the Accent key and then the letter a, you will see a à â æ and so on through all the variations available. The character variations and the order in which the variations appear depend on the language you have selected. To add accented characters 1 Press . The accented character indicator is shown on the display. 2 Press an alpha character. The accent variations are displayed. 3 Use the left and right navigation keys to select the character you want and press . ! You can also access the accent variations for a letter by pressing and briefly holding the corresponding alpha key. Using the Date/Time Stamp You can insert the current date and time on your label. The date and time format depends on the format you have selected in the label maker settings. Setting the Date and Time Before inserting the date and time on your label, you must set the date and time in the label maker settings. To set the date and time 1 Press , select , and then press . 2 Select Set date and time, and then press . 3 Use the navigation keys to set the month, day, and year and then press . 4 Use the navigation keys to set the hour and minutes, and then press . Setting the Date and Time Format You can set the format to use when adding the date and time to your label. To set the date and time format 1 Press , select , and then press . 2 Select Date and time format, and then press . 3 Select the desired date/time format, and then press . Adding the Date and Time You can insert the current date and time on your label. Optionally, you can add text before and after the date and time. To add the date/time stamp ♦ Press Insert , select Date/Time, and then press . The date/time stamp is inserted in the current label. Using Auto-Numbering You can print a series of up to 10 labels at a time using auto-numbering. Adding Auto-Numbering You can add numeric, uppercase, or lowercase autonumbering to your label. Optionally, you can add text before and after the auto-numbering. To add auto-numbering 1 Press Insert , select Auto-numbering, and press . 2 Select the auto-numbering type to use, and press . 3 Select the start value for the auto-numbering, and press . 4 Select the end value for the auto-numbering, and press . 5 Press to print the series of labels. Deleting Auto-Numbering Auto-numbering is entered on the label as one character. To delete auto-numbering 1 Place the cursor at the end of the auto-numbering text on the display. 2 Press . Using Barcodes You can use your label maker to print the following types of barcodes: EAN 8 EAN 13 UPC-A UPC-E Code 39 Code 128 You can only print a barcode on 3/4" (19 mm) wide labels. You can choose whether or not to print the humanreadable text and you can choose to print the humanreadable text either underneath or above the barcode. Optionally, you can add text before and after the barcode. ! Barcodes cannot be used on multi-line labels or labels with vertical or mirror text formatting. Adding a Barcode The barcode text appears on the label in the display just like any other text. However, if the cursor is positioned within the barcode text, the barcode indicator is shown on the display. To add a barcode 1 Press Insert , select Barcode, and then press . 2 Select the barcode type, and then press . 3 Enter the text for the barcode within the barcode on the display, and then press . 4 Select how to print the human-readable text, and then press . 9
-
 1
1 -
2
-
3
-
 4
4 -
 5
5 -
 6
6 -
 7
7 -
 8
8 -
 9
9 -
 10
10 -
 11
11 -
 12
12
 |
 |