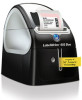
Dymo LabelWriter® 450 Duo Label Printer User Guide 3 - Page 25
Getting Started, Adding My Return Address, Adding My Logo
 |
View all Dymo LabelWriter® 450 Duo Label Printer manuals
Add to My Manuals
Save this manual to your list of manuals |
Page 25 highlights
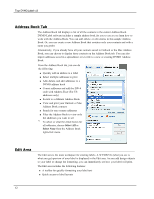
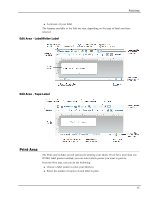
Chapter 5 Getting Started DYMO Label software includes many options for quickly and easily designing and printing labels. You can visually choose the label type and layout you want, select and insert your default logo and return address, and even print directly from the desktop without opening DYMO Label software. Review the following topics to start using DYMO Label software. n Adding My Return Address n Adding My Logo n Finding Your Label Type n Choosing a Layout n Printing Your First Label n Correcting an Address n Printing from the Desktop (Windows) n Using the QuickPrint Widget (Mac) Adding My Return Address When you store a default return address, you can quickly insert this return address into an Address or Text object when needed. You can change your default return address at any time through the Preferences settings. To change or add your return address 1. Do one of the following: l For Windows, choose Preferences from the Edit menu. l For Mac, choose Preferences from the DYMO Label menu. The Preferences dialog box appears. 2. If necessary, select the User information tab. 3. Enter your address in the Default return address box, and then click OK. Adding My Logo You can store an image file to use as your default logo. Once you have stored a default logo, you can quickly add that logo to any label you create. You can change your default logo at any time. You can use the following types of image files for the logo: BMP GIF JPG TIF PNG 17
-
 1
1 -
2
-
3
-
4
-
5
-
6
-
7
-
8
-
9
-
10
-
11
-
12
-
13
-
14
-
15
-
16
-
17
-
18
-
19
-
 20
20 -
 21
21 -
 22
22 -
 23
23 -
 24
24 -
 25
25 -
 26
26 -
 27
27 -
 28
28 -
 29
29 -
 30
30 -
31
-
32
-
33
-
34
-
35
-
36
-
37
-
38
-
39
-
40
-
41
-
42
-
43
-
44
-
45
-
46
-
47
-
48
-
49
-
50
-
51
-
52
-
53
-
54
-
55
-
56
-
57
-
58
-
59
-
60
-
61
-
62
-
63
-
64
-
65
-
66
-
67
-
68
-
69
-
70
-
71
-
72
-
73
-
74
-
75
-
76
-
77
-
78
-
79
-
80
-
81
-
82
-
83
-
84
-
85
-
86
-
87
-
88
-
89
-
90
-
91
-
92
-
93
-
94
-
95
-
96
-
97
-
98
-
99
-
100
-
101
-
102
-
103
-
104
-
105
-
106
-
107
-
108
-
109
-
110
-
111
-
112
-
113
-
114
-
115
-
116
-
117
-
118
-
119
-
120
-
121
-
122
 |
 |
