Dymo LetraTag® Plus LT-100T User Guide 1 - Page 18
Caring for Your Labelmaker
 |
View all Dymo LetraTag® Plus LT-100T manuals
Add to My Manuals
Save this manual to your list of manuals |
Page 18 highlights
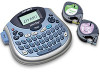
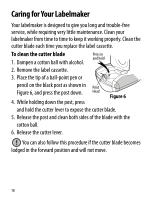
Caring for Your Labelmaker Your labelmaker is designed to give you long and trouble-free service, while requiring very little maintenance. Clean your labelmaker from time to time to keep it working properly. Clean the cutter blade each time you replace the label cassette. To clean the cutter blade Press in and hold 1. Dampen a cotton ball with alcohol. 2. Remove the label cassette. 3. Place the tip of a ball-point pen or pencil on the black post as shown in Print Figure 6, and press the post down. Head 4. While holding down the post, press Figure 6 and hold the cutter lever to expose the cutter blade. 5. Release the post and clean both sides of the blade with the cotton ball. 6. Release the cutter lever. ! You can also follow this procedure if the cutter blade becomes lodged in the forward position and will not move. 18
-
 1
1 -
2
-
3
-
4
-
5
-
6
-
7
-
8
-
9
-
10
-
11
-
12
-
 13
13 -
 14
14 -
 15
15 -
 16
16 -
 17
17 -
 18
18 -
 19
19 -
 20
20 -
 21
21 -
 22
22 -
 23
23 -
24
 |
 |