E-Z-GO Express L4 - Electric Owner Manual - Page 41
Using the Charger, Understanding the Charger
 |
View all E-Z-GO Express L4 - Electric manuals
Add to My Manuals
Save this manual to your list of manuals |
Page 41 highlights
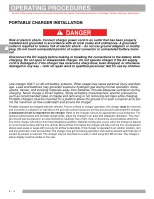
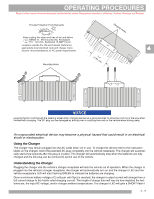
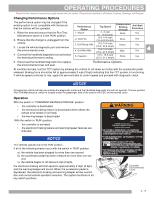
OPERATING PROCEDURES Read all of this manual to become thoroughly familiar with this vehicle. Pay particular attention to all Notices, Cautions, Warnings, and Dangers. Provide Protection From Elements Hanging Holes Keep cooling fins clean and free of dirt and debris NEMA 15 - 5R Grounded AC Receptacle 110 - 120 VAC. Dedicated 15 AMP Circuit Locations outside the US and Canada: Reference appropriate local electrical code and charger manu- 4 facturer recommendations for AC power requirements Mounting Holes (7.893c.1m" ) NOTICE Looping the DC cord through the steering wheel when charging serves as a good reminder to store the cord out of the way when finished with charging. The DC plug can be damaged by driving over or catching the cord on the vehicle when driving away. An ungrounded electrical device may become a physical hazard that could result in an electrical shock or electrocution. Using the Charger The charger may remain plugged into the AC outlet when not in use. To charge the vehicle refer to the instruction labels on the charger. Insert the polarized DC plug completely into the vehicle receptacle. The charger will automatically start a few seconds after the plug is in place. The charger will automatically stop when the batteries are fully charged and the DC plug can be removed to permit use of the vehicle. Understanding the Charger Plugging the charger into the vehicle's charger receptacle will lock the vehicle out of operation. When the charger is plugged into the vehicle's charger receptacle, the charger will automatically turn on and the charger's LED and the vehicle receptacle's LED will start flashing GREEN to indicate the batteries are charging. Once a minimum battery voltage of 2 volts per cell (Vpc) is reached, the charger's output current will change from a full current charge to the trickle rated charging current. The length of charge time will vary by how depleted the batteries are, the input AC voltage, and/or charger ambient temperatures. The charger's LED will give a SHORT flash if 4- 5
-
 1
1 -
2
-
3
-
4
-
5
-
6
-
7
-
8
-
9
-
10
-
11
-
12
-
13
-
14
-
15
-
16
-
17
-
18
-
19
-
20
-
21
-
22
-
23
-
24
-
25
-
26
-
27
-
28
-
29
-
30
-
31
-
32
-
33
-
34
-
35
-
 36
36 -
 37
37 -
 38
38 -
 39
39 -
 40
40 -
 41
41 -
 42
42 -
 43
43 -
 44
44 -
 45
45 -
 46
46 -
47
-
48
-
49
-
50
-
51
-
52
-
53
-
54
-
55
-
56
-
57
-
58
-
59
-
60
-
61
-
62
-
63
-
64
-
65
-
66
-
67
-
68
-
69
-
70
-
71
-
72
-
73
-
74
-
75
-
76
-
77
-
78
-
79
-
80
-
81
-
82
 |
 |
