EVGA 132-CK-NF78-TR User Manual - Page 22
Installing the CPU Fan, Installing Memory DIMMs
 |
View all EVGA 132-CK-NF78-TR manuals
Add to My Manuals
Save this manual to your list of manuals |
Page 22 highlights
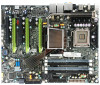
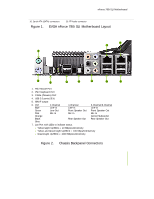
Hardware Installation Note: Make sure the CPU is fully seated and level in the socket. 7. Close the load plate over the CPU and press down while you close and engage the socket lever. Installing the CPU Fan There are many different fan types that can be used with this motherboard. Follow the instruction that came with you fan assembly. Be sure that the fan orientation is correct for your chassis type and your fan assembly. Installing Memory DIMMs Your new motherboard has four 1.8V 240-pin slots for DDR2 memory. These slots support 256 MB, 512 MB, 1 GB, and 2 GB DDR2 memory modules. They also support dual channel DDR2 memory technology up to 10.7GB/s. There must be at least one memory bank populated to ensure normal operation. Use the following the recommendations for installing memory. (See Figure 1 on page 7 for the location of the memory slots.) ‰ One DIMM: Install into slot 0. You can install the DIMM into any slot, however, slot 0 is preferred. ‰ Two DIMMs: Install into either slots 0 and 1 or 2 and 3. The idea is to not have the DIMMs in adjacent slots. ‰ Four DIMMS: Install into slots 0, 1, 2, and 3. CPU side DIMM Slot 0 DIMM Slot 2 Card-edge DIMM Slot 1 DIMM Slot 3
-
 1
1 -
2
-
3
-
4
-
5
-
6
-
7
-
8
-
9
-
10
-
11
-
12
-
13
-
14
-
15
-
16
-
 17
17 -
 18
18 -
 19
19 -
 20
20 -
 21
21 -
 22
22 -
 23
23 -
 24
24 -
 25
25 -
 26
26 -
 27
27 -
28
-
29
-
30
-
31
-
32
-
33
-
34
-
35
-
36
-
37
-
38
-
39
-
40
-
41
-
42
-
43
-
44
-
45
-
46
-
47
-
48
-
49
-
50
-
51
-
52
-
53
-
54
-
55
-
56
-
57
-
58
-
59
-
60
-
61
-
62
-
63
-
64
-
65
-
66
-
67
-
68
-
69
-
70
-
71
-
72
-
73
-
74
-
75
-
76
-
77
-
78
-
79
-
80
-
81
-
82
-
83
-
84
-
85
-
86
-
87
-
88
-
89
-
90
-
91
-
92
-
93
-
94
-
95
-
96
-
97
-
98
-
99
-
100
-
101
-
102
-
103
-
104
-
105
-
106
-
107
-
108
-
109
-
110
-
111
-
112
-
113
-
114
-
115
-
116
-
117
-
118
-
119
-
120
-
121
-
122
-
123
-
124
-
125
-
126
-
127
 |
 |
