EVGA 270-SE-W888-KR User Guide - Page 2
Table of Contents - classified sr x
 |
View all EVGA 270-SE-W888-KR manuals
Add to My Manuals
Save this manual to your list of manuals |
Page 2 highlights
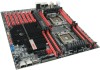
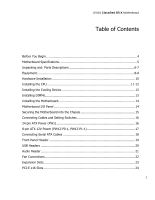
EVGA Classified SR-X Motherboard Table of Contents Before You Begin 4 Motherboard Specifications 5 Unpacking and Parts Descriptions 6-7 Equipment ...8-9 Hardware Installation 10 Installing the CPU 11-12 Installing the Cooling Device 13 Installing DIMMs 13 Installing the Motherboard 14 Motherboard I/O Panel 14 Securing the Motherboard into the Chassis 15 Connecting Cables and Setting Switches 16 24-pin ATX Power (PW1 16 8-pin ATX 12V Power (PW12-P0-1, PW12-P1-1 17 Connecting Serial ATA Cables 18 Front Panel Header 19 USB Headers ...20 Audio Header...21 Fan Connections 22 Expansion Slots 23 PCI-E x16 Slots 24 2
-
 1
1 -
 2
2 -
 3
3 -
 4
4 -
 5
5 -
 6
6 -
 7
7 -
 8
8 -
9
-
10
-
11
-
12
-
13
-
14
-
15
-
16
-
17
-
18
-
19
-
20
-
21
-
22
-
23
-
24
-
25
-
26
-
27
-
28
-
29
-
30
-
31
-
32
-
33
-
34
-
35
-
36
-
37
 |
 |

EVGA
Classified SR-X
Motherboard
2
Table of Contents
Before You Begin…
...............................................................................................
4
Motherboard Specifications
....................................................................................
5
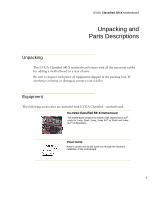
Unpacking and
Parts Descriptions
......................................................................
6-7
Equipment
.........................................................................................................
8-9
Hardware Installation
..........................................................................................
10
Installing the CPU
..........................................................................................
11-12
Installing the Cooling Device
................................................................................
13
Installing DIMMs
.................................................................................................
13
Installing the Motherboard
...................................................................................
14
Motherboard I/O Panel
........................................................................................
14
Securing the Motherboard into the Chassis
...........................................................
15
Connecting Cables and Setting Switches
...............................................................
16
24-pin ATX Power (PW1)
.....................................................................................
16
8-pin ATX 12V Power (PW12-P0-1, PW12-P1-1)
....................................................
17
Connecting Serial ATA Cables
..............................................................................
18
Front Panel Header
.............................................................................................
19
USB Headers
......................................................................................................
20
Audio Header
......................................................................................................
21
Fan Connections
.................................................................................................
22
Expansion Slots
...................................................................................................
23
PCI-E x16 Slots
...................................................................................................
24