EVGA 270-SE-W888-KR User Guide - Page 27
Jumper Settings, PCI-E Disable Switches
 |
View all EVGA 270-SE-W888-KR manuals
Add to My Manuals
Save this manual to your list of manuals |
Page 27 highlights
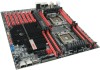
EVGA Classified SR-X Motherboard Jumper Settings PCI-E Disable Switches For the ease of troubleshooting multiple graphics cards or testing an individual graphics card's overclocking, EVGA has implemented seven switches you can use to disable individual PCI-E slots. You don't need to remove any of your graphics cards but simply disable the slot the particular card is in. JPE1 JPE2 JPE3 JPE4 JPE5 JPE6 JPE7 You see the location of the 7 switches in the above diagram. They are located right above the reset button and BIOS selector. In default shipping configurations, all slots are enabled with the jumpers in the left position. From top to bottom, PCI-E slots 1, 2, 3, 4, 5, 6, 7 respectively. To disable a PCI-E slot move the switch over to the right position. Do this when the PC is turned off, NOT while it is running! 27
-
 1
1 -
2
-
3
-
4
-
5
-
6
-
7
-
8
-
9
-
10
-
11
-
12
-
13
-
14
-
15
-
16
-
17
-
18
-
19
-
20
-
21
-
 22
22 -
 23
23 -
 24
24 -
 25
25 -
 26
26 -
 27
27 -
 28
28 -
 29
29 -
 30
30 -
 31
31 -
 32
32 -
33
-
34
-
35
-
36
-
37
 |
 |
