Edimax PT-31E Quick Install Guide - Page 6
while it is testing its pan and tilt
 |
View all Edimax PT-31E manuals
Add to My Manuals
Save this manual to your list of manuals |
Page 6 highlights
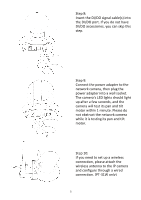
Step 8: Insert the DI/DO signal cable(s) into the DI/DO port. If you do not have DI/DO accessories, you can skip this step. Step 9: Connect the power adapter to the network camera, then plug the power adapter into a wall socket. The camera's LED lights should light up after a few seconds, and the camera will test its pan and tilt motor within 1 minute. Please do not obstruct the network camera while it is testing its pan and tilt motor. Step 10: If you need to set up a wireless connection, please attach the wireless antenna to the IP camera and configure through a wired connection. (PT-31W only) 5
-
 1
1 -
 2
2 -
 3
3 -
 4
4 -
 5
5 -
 6
6 -
 7
7 -
 8
8 -
 9
9 -
 10
10 -
 11
11 -
 12
12 -
13
-
14
-
15
-
16
-
17
-
18
-
19
-
20
 |
 |

5
Step 8:
Insert the DI/DO signal cable(s) into
the DI/DO port. If you do not have
DI/DO accessories, you can skip this
step.
Step 9:
Connect the power adapter to the
network camera, then plug the
power adapter into a wall socket.
The camera’s LED lights should light
up after a few seconds, and the
camera will test its pan and tilt
motor within 1 minute. Please do
not obstruct the network camera
while it is testing its pan and tilt
motor.
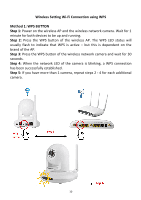
Step 10:
If you need to set up a wireless
connection, please attach the
wireless antenna to the IP camera
and configure through a wired
connection. (PT-31W only)