Electrolux E36GC75PSS Installation Instructions (English Español Fran - Page 7
Check Operation
 |
View all Electrolux E36GC75PSS manuals
Add to My Manuals
Save this manual to your list of manuals |
Page 7 highlights
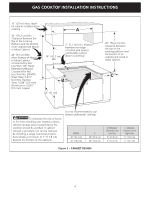
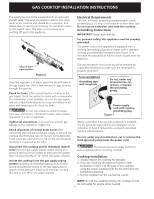
GAS COOKTOP INSTALLATION INSTRUCTIONS Check Operation Refer to the Use and Care Guide packaged with the appliance for operating instructions and for care and cleaning of your cooktop. Do not touch the burners. They may be hot enough to cause burns. 1. Check Burner Cap Placement Regular burner It is very important to be sure that all surface burner caps and burner grates are properly installed and in the correct locations before operating the appliance. Please note that the burner heads are secured to the cooktop. The cooktop is not removable. Do not attempt to remove or lift the cooktop. To prevent flare-ups and avoid creation of harmful by-products, do not use the cooktop without all burner caps properly installed to insure proper ignition and gas flame size. Always keep the burner caps and burner grates in place whenever the surface burners are in use. DO not allow spills, food, cleaning agents or any other material to enter the gas orifice holder openings. Check and be sure the size of each burner cap matches the size of the burner head. Check and be sure that all round style burner caps are correctly in place on round burner heads. Check and be sure that all oval style burner caps are correctly in place on oval burner heads (if equipped). Check and be sure that all dual or twin style burner caps are correctly in place on dual or twin heads (if equipped). On round style burners, the burner cap lip (Figure 8) should fit snug into the center of burner head and be level. Refer to figures 9 & 10 for correct and incorrect burner cap placement. Once in place, you may check the fit by gently sliding the burner cap from side to side (Figure 11) to be sure it is centered and firmly seated. When the burner cap lip makes contact inside the center of the burner head you will be able to hear the burner cap click. Please note that the burner cap should NOT move off the center of the burner head when sliding from side to side. Burner Head Fig. 8 Burner Cap Lip Correct Burner Cap Placement Fig. 9 Incorrect Burner Cap Placement Fig. 10 Fig. 11 Dual Flame burner (If equipped) Remove all tapes from burner cap Be sure that the dual flame burner caps are correctly placed BEFORE using your cooktop. Note: There are no burner adjustments necessary on this cooktop. Burner Cap Burner Head Burner Simmer Precision Flame Figure 12 7
-
 1
1 -
 2
2 -
 3
3 -
 4
4 -
 5
5 -
 6
6 -
 7
7 -
 8
8 -
 9
9 -
 10
10 -
 11
11 -
 12
12 -
13
-
14
-
15
-
16
-
17
-
18
-
19
-
20
-
21
-
22
-
23
-
24
 |
 |
