Electrolux EI15IM55GS Complete Owner's Guide (English) - Page 7
Site Preparation - model
 |
UPC - 012505673641
View all Electrolux EI15IM55GS manuals
Add to My Manuals
Save this manual to your list of manuals |
Page 7 highlights
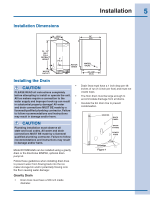
Site Preparation 7 Preparing the Site IMPORTANT It is extremely important that the unit is level. If it is not level, the ice mold will not fill evenly. This can cause a reduction in ice rate, uneven sized cubes or water spilling into the storage area which will cause the ice in the bin to melt prematurely. Remember that floors near drains have a tendency to slope towards the drain. 1 Position the unit on a flat, level surface, capable of supporting the entire weight of the unit. Remember that the unit will be significantly heavier once it is fully loaded. 2 The surrounding air temperature must be at least 50°F (10°C) but must not exceed 110°F (43°C). 3 The unit must not be located near heatgenerating equipment or in direct sunlight. DANGER ELECTROCUTION HAZARD! Electrical Grounding Required. This appliance is equipped with a three prong (grounding) polarized plug for your protection against possible shock hazards. • NEVER remove the round grounding prong from the plug. • NEVER use a two-prong grounding adapter. • NEVER use an extension cord to connect power to the unit. Where a two-prong wall receptacle is encountered or a longer power cord is required, contact a qualified electrician to have it replaced in accordance with applicable electrical codes. 4 The unit must be located to allow clearance for water, drain and electrical connections in the rear of the ice maker. 5 Connect the unit to a grounded and polarized 115 VAC, 60 Hz, 15 A circuit (normal household current). 6 Avoid connecting the unit to a Ground Fault Interruptor (GFI). GFIs are prone to nuisance tripping which will cause the unit to shut down. GFIs are generally not used on circuits which power equipment that must run unattended for long periods of time. 7 The unit must be installed according to your local codes and ordinances. NOTE The door of the unit may be mounted on either side of the cabinet (see REVERSING THE DOOR). All units require zero clearance when installed flush with a cabinet or wall (see Figure 2). Electrolux stainless steel models require a minimum 2-3/4 inch handle clearance when installed against a wall or cabinet that extends beyond the front edge of the unit (see Figure 3). DOOR SWING Figure 2 CABINET OR WALL 0" CLEARANCE NEEDED UL124A Figure 3 2 - 3/4" 8 Position the unit to allow free air flow through the front grille (see Figure 4). 9 Wipe out inside of unit with a damp cloth. EXHAUST Figure 4 INTAKE
-
 1
1 -
 2
2 -
 3
3 -
 4
4 -
 5
5 -
 6
6 -
 7
7 -
 8
8 -
 9
9 -
 10
10 -
 11
11 -
 12
12 -
13
-
14
-
15
-
16
-
17
-
18
-
19
-
20
-
21
-
22
 |
 |
