Electrolux EI24BC65GS Complete Owner's Guide (English) - Page 10
Remove door gasket, turn 180°,
 |
UPC - 012505673634
View all Electrolux EI24BC65GS manuals
Add to My Manuals
Save this manual to your list of manuals |
Page 10 highlights
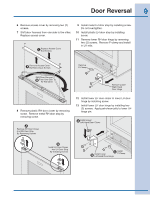
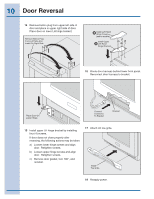
10 Door Reversal 14 Remove button plug from upper left side of door and place in upper right side of door. Place door on lower LH hinge bracket. Remove Button Plug From Left Side And Install On Right Side 16 Route door harness behind lower front panel. Reconnect door harness to bracket. 15 Install upper LH hinge bracket by installing four (4) screws. If door does not close properly after reversing, the following actions may be taken: a) Loosen lower hinge screws and align door. Retighten screws. b) Loosen upper hinge screws and align door. Retighten screws. c) Remove door gasket, turn 180°, and reinstall. 17 Attach LH toe grille. 18 Reapply power.
-
 1
1 -
2
-
3
-
4
-
 5
5 -
 6
6 -
 7
7 -
 8
8 -
 9
9 -
 10
10 -
 11
11 -
 12
12 -
 13
13 -
 14
14 -
 15
15 -
16
-
17
-
18
 |
 |

10
14
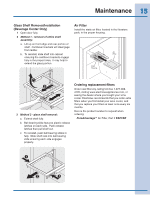
Remove button plug from upper left side of
door and place in upper right side of door.
Place door on lower LH hinge bracket.
Door Reversal
15
Install upper LH hinge bracket by installing
four (4) screws.
If door does not close properly after
reversing, the following actions may be taken:
a)
Loosen lower hinge screws and align
door.
Retighten screws.
b)
Loosen upper hinge screws and align
door.
Retighten screws.
c)
Remove door gasket, turn 180°, and
reinstall.
Remove Button Plug
From Left Side And
Install On Right Side
16
Route door harness behind lower front panel.
Reconnect door harness to bracket.
17
Attach LH toe grille.
18
Reapply power.