Electrolux EI26SS55G Complete Owner's Guide (English)
Electrolux EI26SS55G - 25.9 cu. Ft. Refrigerator Manual
 |
View all Electrolux EI26SS55G manuals
Add to My Manuals
Save this manual to your list of manuals |
Electrolux EI26SS55G manual content summary:
- Electrolux EI26SS55G | Complete Owner's Guide (English) - Page 1
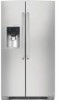
Use & Care Guide Side-By-Side Refrigerator Guia de Uso y Cuidado Refrigerador de dos puertas Guide d'utilisation et d'entretien Réfrigérateur à compartiments juxtaposés 241868903 December 2008 - Electrolux EI26SS55G | Complete Owner's Guide (English) - Page 2
in home appliances. This Use & Care Guide is part of our commitment to customer satisfaction and product quality throughout the service life of your new appliance. Keep a record for quick reference Purchase date Electrolux model number Electrolux serial number NOTE Registering your product with - Electrolux EI26SS55G | Complete Owner's Guide (English) - Page 3
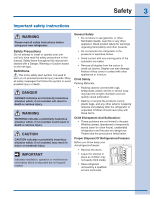
cause suffocation. • Destroy or recycle the product's carton, plastic bags, and any other exterior wrapping material immediately after the refrigerator is unpacked. Children should never play with these items. Child Entrapment And Suffocation: • These problems are not limited to the past. Whether - Electrolux EI26SS55G | Complete Owner's Guide (English) - Page 4
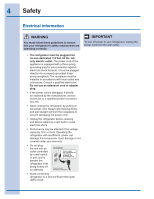
Do not use an extension cord or adapter plug. • If the power cord is damaged, it should be replaced by the manufacturer, service technician or a qualified person to prevent any risk. • Never unplug the refrigerator by pulling on the power cord. Always grip the plug firmly, and pull straight out from - Electrolux EI26SS55G | Complete Owner's Guide (English) - Page 5
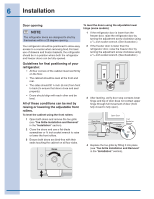
that is level and strong enough to support a fully loaded refrigerator. • Consider water supply availability for models equipped with an automatic ice maker. Toe Grille Installation and Removal To install toe grille 1 Open both doors. Slide left and right sides of toe grille over lower hinges of - Electrolux EI26SS55G | Complete Owner's Guide (English) - Page 6
best use of drawers and freezer baskets, the refrigerator should be in a position where both the refrigerator and freezer doors can be fully opened. To level the doors using the adjustable lower hinge (some models): 1 If the refrigerator the cabinet on all four sides. 3 After leveling, verify - Electrolux EI26SS55G | Complete Owner's Guide (English) - Page 7
: 1 Make sure the electrical power cord is unplugged from the wall outlet. 2 Open both doors and remove the toe grille (as explained in the Installation Instructions that came with your appliance). 3 Remove any food from the door shelves. 4 Close the doors. To remove the refrigerator top hinge cover - Electrolux EI26SS55G | Complete Owner's Guide (English) - Page 8
press its outer sleeve inward. 1 Detach the multi-wire cable connector located above the top hinge. Grasp both sides of the connector firmly and pull apart. Adjustable Hinge (some models) 2 Trace lightly around the hinge with a pencil. This makes reinstallation easier. Non-Adjusting Hinge (some - Electrolux EI26SS55G | Complete Owner's Guide (English) - Page 9
Handle Mounting Instructions 1 Remove handles from carton and any other protective packaging. 2 Position freezer handle end caps over upper and lower pre-installed shoulder bolts (A) that are fastened into door, ensuring the holes for the set screws are facing towards the refrigerator door. 3 While - Electrolux EI26SS55G | Complete Owner's Guide (English) - Page 10
. During installation, you (or a service professional) establish this water supply by connecting a copper tube from your household water system to a valve at the rear of the refrigerator. You may have already followed the directions in the Installation Instructions to connect the water supply. This - Electrolux EI26SS55G | Complete Owner's Guide (English) - Page 11
Connecting The Water Supply 11 7 Secure the copper tube to your refrigerator's rear panel with a steel clamp and screw (see illustration). 8 Coil the excess copper tubing (about 2½ turns) behind your refrigerator as shown. Arrange coiled tubing to avoid vibration or wear against other surfaces. 9 - Electrolux EI26SS55G | Complete Owner's Guide (English) - Page 12
Understanding features and terms Your Electrolux refrigerator is designed for optimal convenience and storage flexibility. Use the illustration below to familiarize yourself with product features and terminology. Door Cover Fixed Door Bin Toe Grille NOTE Features may vary according to model. - Electrolux EI26SS55G | Complete Owner's Guide (English) - Page 13
Wave-TouchTM Controls 13 IQ-TouchTM - Electrolux EI26SS55G | Complete Owner's Guide (English) - Page 14
are illuminated: fast ice Increases the production of ice fast freeze Activates a faster rate for freezing food dispenser light On / Off control lock Press and hold for three seconds to activate and deactivate. This restricts undesired changes to the refrigerators settings and prevents use of - Electrolux EI26SS55G | Complete Owner's Guide (English) - Page 15
and the refrigerator will resume normal operation. All other modes are turned off until the alarm is acknowledged. In the event of a power failure, the power fail alert will be displayed and the alarm off key will be illuminated and you will hear an audible alarm until the alarm off icon is pressed - Electrolux EI26SS55G | Complete Owner's Guide (English) - Page 16
. The temperature display will read OFF. IMPORTANT Pressing the system off icon does not turn off power to your refrigerator. You must unplug the power cord from the wall outlet. Your refrigerator is equipped with a Glass Touch Panel user interface display. It is only necessary to touch the glass - Electrolux EI26SS55G | Complete Owner's Guide (English) - Page 17
highest temperature reached will be displayed and the refrigerator will resume normal operation. All other modes are turned off until the alarm is acknowledged. In the event of a power failure, the power fail alert will be displayed and the mute sounds icon will be illuminated and you will hear an - Electrolux EI26SS55G | Complete Owner's Guide (English) - Page 18
vary according to model. You can easily have mounting brackets which attach to slotted supports at the rear of each compartment. the sides of the compartment. Shelf features Your refrigerator best when stored with the Humidity Control set on Higher Humidity, or in a drawer without a Humidity Control - Electrolux EI26SS55G | Complete Owner's Guide (English) - Page 19
your crisper. 3 Lift the front slightly and remove the drawer. Meat keeper (some models) Some models are equipped with a meat keeper drawer for short-term storage of bulk meat items. This drawer includes a sliding control for adjusting the temperature inside. Any meat to be kept longer than two - Electrolux EI26SS55G | Complete Owner's Guide (English) - Page 20
models) The Perfect Temp Drawer (PTD) was designed to keep food items at a precise temperature that is cooler, the same, or warmer than the fresh food side of the refrigerator. The PTD is shipped turned OFF. When first turned on or after a power drawer will begin controlling to the temperature - Electrolux EI26SS55G | Complete Owner's Guide (English) - Page 21
Perfect Temp Drawer functions as a non temperature controlled drawer. The Perfect Temp Drawer is intended for packaged food products only. Leafy vegetables and unpackaged fruits are best kept in one of the lower crisper out. 3 Lift the front of the shelf assembly up off of the front support pins. - Electrolux EI26SS55G | Complete Owner's Guide (English) - Page 22
fridge. 4 Drop the shelf down insuring that the support pins fully snap into the grooves in the shelf. 5 Reconnect the frame connector to the control unit and reinstall the drawer. Refrigerator on/off button and the Perfect Temp Drawer When the refrigerator is turned off by pressing the main Wave - Electrolux EI26SS55G | Complete Owner's Guide (English) - Page 23
supports until locked in place. Accessories Tall bottle retainer The tall bottle retainer keeps tall containers in the bin from falling forward when opening or closing the refrigerator such as your favorite ice cream. Pizza rack (some models) This rack is attached to the freezer wall beside the - Electrolux EI26SS55G | Complete Owner's Guide (English) - Page 24
, for short term storage of cheese, spreads, or butter. The dairy compartment, which includes a lift-up cover that may be locked and a dairy divider (some models), is designed to be warmer than the open storage area to accommodate these types of food. Dairy Compartment (some - Electrolux EI26SS55G | Complete Owner's Guide (English) - Page 25
your refrigerator. If production is controlled by the ice maker's On/ Off power switch. To gain access to the ice maker, pull the extra shelf out (some models rate of eight cubes every 75 to 90 minutes. NOTE The ice maker also has a built-in wire signal arm, which automatically stops ice production - Electrolux EI26SS55G | Complete Owner's Guide (English) - Page 26
changing. If you have a side mounted ice maker you may to keep ice separated. • If your refrigerator is not connected to a water supply of ice at one time, it is best to get cubes directly from the ice container ice production. Remove and empty the ice storage bin if: • An extended power failure (one - Electrolux EI26SS55G | Complete Owner's Guide (English) - Page 27
below) until the ice bin fits into place with the drive mechanism. If the auger is not properly aligned when replacing the ice bin, the refrigerator will only dispense Crushed Ice. The freezer door may also not close properly causing warm air to leak into the freezer. - Electrolux EI26SS55G | Complete Owner's Guide (English) - Page 28
you bought your refrigerator. Electrolux recommends that you order extra filters when you first install your refrigerator, and that you replace your filters at least once every six months. Here is the product number to request when ordering: PureAdvantageTM Water Filter and Air Filter Part #EAFWF01 - Electrolux EI26SS55G | Complete Owner's Guide (English) - Page 29
Rated Capacity - 400 gallons for PureAdvantageTM ice and water filter • Rated service flow - .5 gallons per minute • Maximum Rated replacement. 1 Turn Off the ice maker power switch. 2 Push the filter release button below Water Dispenser control panel for three seconds. When the display changes from " - Electrolux EI26SS55G | Complete Owner's Guide (English) - Page 30
an added layer of insulation between the two appliances will help the refrigerator operate more efficiently. • Level the refrigerator so that the doors close tightly. Temperature settings • Refer to the "Controls" section in this Use & Care Guide for procedures on temperature settings. Frozen food - Electrolux EI26SS55G | Complete Owner's Guide (English) - Page 31
You may hear air being forced through the refrigerator by the evaporator fan. C Defrost heater the ice bin. E Electronic control & automatic defrost control These parts can produce a snapping or clicking chute. M Perfect Temp Drawer (some models) Fans run intermittently when door is closed but - Electrolux EI26SS55G | Complete Owner's Guide (English) - Page 32
temperatures, be sure to completely drain the water supply system. Failure to do so could result in water leaks when the refrigerator is put back into service. Contact a service representative to perform this operation. Refer to the guide on the next page for details on caring and cleaning specific - Electrolux EI26SS55G | Complete Owner's Guide (English) - Page 33
dust from front of toe grille. • Remove toe grille (see Installation Instructions). • Vacuum backside and wipe with sudsy cloth or sponge. Rinse and dry. Exterior & Handles Exterior & Handles (Stainless Steel Models Only) • Soap and water • Non abrasive glass cleaner • Soap and water • Stainless - Electrolux EI26SS55G | Complete Owner's Guide (English) - Page 34
broken glass. 3 Remove light cover, if necessary. 4 Unscrew and replace old bulb with an appliance bulb of the same type and wattage (normally 40 watts). 5 Replace light cover, if necessary. 6 Plug in the refrigerator's power cord. Light Bulb Light Socket Located Behind Right Rear of Ice Container - Electrolux EI26SS55G | Complete Owner's Guide (English) - Page 35
warranted by Electrolux Major Appliances North America, a division of Electrolux Home Products, Inc. In Canada, your appliance is warranted by Electrolux Canada Corp. Electrolux authorizes no person to change or add to any obligations under this warranty. Obligations for service and parts under this - Electrolux EI26SS55G | Complete Owner's Guide (English) - Page 36
control system keeps the refrigerator at a constant temperature. • Electronic control system has detected a performance problem. • This is normal. Refrigerator goes on and off to keep temperature constant. • Call your Electrolux service representative, who can interpret any messages or number - Electrolux EI26SS55G | Complete Owner's Guide (English) - Page 37
Problem Freezer temperature too cold. Refrigerator temperature is satisfactory. Refrigerator temperature too cold. Freezer temperature is satisfactory. Food stored in drawers freezes. Food stored in Meat Keeper freezes (some models). Cause • Freezer control is set too cold. • Refrigerator control - Electrolux EI26SS55G | Complete Owner's Guide (English) - Page 38
refrigerator to meet warm air from outside. Correction • The rate of frost buildup and internal sweating increases. • See Problem models) Problem Display does not illuminate or shows "CE". Display shows "LOC" when buttons are pressed. Cause • Connector not connected or loose. • Drawer in control - Electrolux EI26SS55G | Complete Owner's Guide (English) - Page 39
Solutions To Common Problems 39 Automatic Ice Maker Problem Cause Correction Ice maker is not • Ice maker power switch is Off. • Turn on power switch. making any ice. • Water supply is not connected • Connect water supply (see Installation to refrigerator. Instructions). • Household water - Electrolux EI26SS55G | Complete Owner's Guide (English) - Page 40
use, temperature fluctuations, and/or power outages. • Ice cubes are should operate. • Turn freezer control to a higher setting so that best at 30-100 psi water pressure. Well water pressures should fall within this range. Water Dispenser Problem low. • Cut-off and cut-on pressures are too low - Electrolux EI26SS55G | Complete Owner's Guide (English) - Page 41
Ensure floor is level and solid, and can adequately support the refrigerator. Contact a carpenter to correct a sagging or sloping floor. Problem Light bulb is not on. Cause • Light bulb is burned out. • Freezer light switch is stuck. • No electric current is reaching refrigerator. • Control - Electrolux EI26SS55G | Complete Owner's Guide (English) - Page 42
-
 1
1 -
 2
2 -
 3
3 -
 4
4 -
 5
5 -
 6
6 -
 7
7 -
8
-
9
-
10
-
11
-
12
-
13
-
14
-
15
-
16
-
17
-
18
-
19
-
20
-
21
-
22
-
23
-
24
-
25
-
26
-
27
-
28
-
29
-
30
-
31
-
32
-
33
-
34
-
35
-
36
-
37
-
38
-
39
-
40
-
41
-
42
 |
 |
241868903
December 2008
Use & Care Guide
Side-By-Side Refrigerator
Guia de Uso y Cuidado
Refrigerador de dos puertas
Guide d’utilisation et d’entretien
Réfrigérateur à compartiments juxtaposés