Electrolux EI26SS55G Complete Owner's Guide (English) - Page 18
Storage Features
 |
View all Electrolux EI26SS55G manuals
Add to My Manuals
Save this manual to your list of manuals |
Page 18 highlights
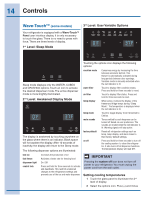
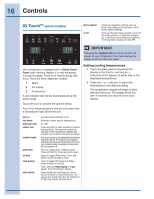
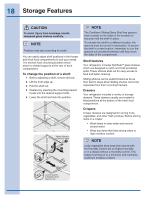
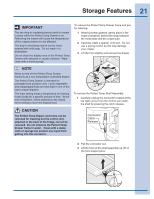
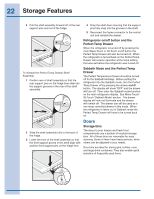
18 Storage Features CAUTION To avoid injury from breakage, handle tempered glass shelves carefully. NOTE Features may vary according to model. You can easily adjust shelf positions in the freezer and fresh food compartments to suit your needs. The shelves have mounting brackets which attach to slotted supports at the rear of each compartment. To change the position of a shelf: 1 Before adjusting a shelf, remove all food. 2 Lift the front edge up. 3 Pull the shelf out. 4 Replace by inserting the mounting bracket hooks into the desired support slots. 5 Lower the shelf and lock into position. Tighten Spacers to Remove Shelf 1 2 3 1 NOTE The Cantilever Sliding Glass Shelf has spacers (side screws) on the sides of the brackets to securely hold the shelf in place. To relocate the shelf to a different location, the spacers must be turned in (clockwise). To secure the shelf in a new location, remember to turn the spacers out (counterclockwise) until they touch the sides of the compartment. Shelf features Your refrigerator includes SpillSafeTM glass shelves, which are designed to catch and hold accidental spills. These shelves slide out for easy access to food and faster cleaning. Sliding shelves can be pulled forward as far as their built-in stops allow. Sliding shelves cannot be separated from their mounting brackets. Drawers Your refrigerator includes a variety of storage drawers. These drawers usually are located in fixed positions at the bottom of the fresh food compartment. Crispers Crisper drawers are designed for storing fruits, vegetables, and other fresh produce. Before storing items in a crisper: • Wash items in clear water and remove excess water. • Wrap any items that have strong odors or high moisture content. NOTE Leafy vegetables keep best when stored with the Humidity Control set on Higher Humidity, or in a drawer without a Humidity Control. This keeps incoming air to a minimum and maintains maximum moisture content. Loosen Spacers to Stabilize Shelf Against Liner
-
 1
1 -
2
-
3
-
4
-
5
-
6
-
7
-
8
-
9
-
10
-
11
-
12
-
 13
13 -
 14
14 -
 15
15 -
 16
16 -
 17
17 -
 18
18 -
 19
19 -
 20
20 -
 21
21 -
 22
22 -
 23
23 -
24
-
25
-
26
-
27
-
28
-
29
-
30
-
31
-
32
-
33
-
34
-
35
-
36
-
37
-
38
-
39
-
40
-
41
-
42
 |
 |