Electrolux EIFLS55IIW Installation Instructions (All Languages) - Page 9
Installation Instructions - pedestal
 |
UPC - 012505381737
View all Electrolux EIFLS55IIW manuals
Add to My Manuals
Save this manual to your list of manuals |
Page 9 highlights
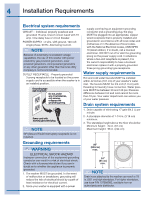
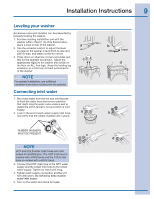
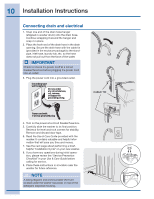
Installation Instructions 9 Leveling your washer Excessive noise and vibration can be prevented by properly leveling the washer. 1. For free standing installation and with the washer within 4 feet (1 m) of its final location, place a level on top of the washer. a 2. Use the universal wrench to adjust the level- ing legs so the washer is level front-to-rear and side-to-side, and stable corner-to-corner. 3. Press down on alternate corners and sides and feel for the slightest movement. Adjust the c appropriate leg(s) so the washer sits solidly on the floor on ALL four legs. Keep the leveling leg extension at a minimum for best performance of the washer. NOTE For pedestal installations, see additional installation instructions included with the pedestal. Connecting inlet water 1. Run some water from the hot and cold faucets to flush the water lines and remove particles that might clog the water valve screens and to determine which faucet is hot and which is cold supply. 2. Look in the end of each water supply inlet hose a and verify that the rubber washers are in place. b raise lower d b RUBBER WASHERS MUST BE PRESENT c d NOTE HOT and COLD water inlet hoses are color coded for identification. The HOT inlet hose is marked with a RED band and the COLD inlet hose is marked with a BLUE band. 3. Connect the HOT inlet hose to the HOT water supply and the COLD inlet hose to the COLD water supply. Tighten by hand until snug. 4. Tighten each supply connection another 2/3 turn with pliers. Do not bend, kink or pinch water inlet hoses. 5. Turn on the water and check for leaks.
-
 1
1 -
2
-
3
-
 4
4 -
 5
5 -
 6
6 -
 7
7 -
 8
8 -
 9
9 -
 10
10 -
 11
11 -
 12
12 -
 13
13 -
 14
14 -
15
-
16
-
17
-
18
-
19
-
20
-
21
-
22
-
23
-
24
-
25
-
26
-
27
-
28
-
29
-
30
-
31
-
32
-
33
-
34
-
35
-
36
-
37
-
38
-
39
-
40
-
41
-
42
-
43
-
44
-
45
-
46
-
47
-
48
-
49
-
50
-
51
-
52
-
53
-
54
-
55
-
56
 |
 |
