Electrolux SC899F Owners Guide - Page 10
HOW TO MAINTAIN, Quick Kleen, Fan Chamber, Cleaner Care
 |
UPC - 023169100831
View all Electrolux SC899F manuals
Add to My Manuals
Save this manual to your list of manuals |
Page 10 highlights
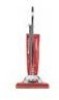
HOW TO MAINTAIN The instructions given in this booklet serve as a guide to routine maintenance. To avoid unnecessary service calls, check the bag, belt and brush roll often. Quick Kleen® Fan Chamber NOTE: Turn off the switch and unplug the electrical cord before cleaning. The clear, removable fan chamber cover provides easy inspection, cleaning, and maintenance of the fan chamber. Removing the cover provides easy access to the motor fan. Grease buildup, dirt, or other obstructions, visible through the fan cover, should be removed. To clean the fan area, take off the chrome bottom plate by releasing the two cam locks (see Brush Roll Belt, Figure 1 and 2). Remove the belt from the motor pulley, then loosen and remove the screws on either side of the fan cover, as indicated by the arrows. Push the cam locks outward against the wheels to lift the cover from the cleaner base. Dirt and obstructions can easily be cleared; however, caked grease may need to be scraped from the cover and the cleaner. If the fan does not turn freely, it also should be removed for cleaning. To remove the fan, place a wrench over the motor pulley. Hold the fan blades with one hand and turn the wrench counterclockwise. Remove the motor pulley and lift the fan off the motor shaft. Clean the area and replace the fan over the motor shaft. Tighten the motor pulley snugly clockwise with the wrench. If necessary, replace the fan cover or the gasket with replacement parts. Be sure the gasket is in place. Reposition the fan cover by first placing the exhaust end into place between the large rear wheels. Seat the fan cover firmly. Next replace the belt and bottom plate as the pressure from the bottom plate helps seal the fan cover. Start the two screws by hand to be sure they are straight, then tighten. Order fan chamber cover replacement kit (fan cover, gasket, two screws) Part No. 52334. Cleaner Care NOTE: Turn off the switch and unplug the electrical cord before cleaning unit. To keep the vacuum cleaner looking new, it can be wiped with a damp cloth and a mild soap solution, then thoroughly dried. Never use any type of chemical as chemicals can damage the cleaner. When not in use, the cleaner should be stored in a clean, dry place. 10
-
 1
1 -
2
-
3
-
4
-
 5
5 -
 6
6 -
 7
7 -
 8
8 -
 9
9 -
 10
10 -
 11
11 -
 12
12 -
 13
13 -
 14
14 -
 15
15 -
16
 |
 |
