Emerson ER100104 User Manual - Page 1
Emerson ER100104 Manual
 |
View all Emerson ER100104 manuals
Add to My Manuals
Save this manual to your list of manuals |
Page 1 highlights
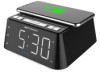
2 White Wireless Charging * Les marquages sont inscrits en bas de l'appareil. Les précautions d'emploi sont inscrites en bas de l'appareil. La prise du secteur ne doit pas ētre obstruée ou doit ētre facilement accessible pendant son utilisation. Pour étre complètement déconnecté de l'alimentation d'entrée, la prise doit ētre débranchée du secteur. Les piles ne doivent pas ētre exposées à de forte chaleur, tel qu'á la lumière du soleil, au feu ou autres choses de semblable. La prise du secteur est utilisé pour déconnecter le système. La prise du secteur ne doit pas être obstruée ou doit être facilement accessible pendant son utilisation. Pour être complètement déconnecté de l'alimentation d'entrée, la prise doit être débranchée du secteur. L'adaptateur AC/AC de l'appareil est utilisé pour déconnecter le système. L'adaptateur AC/AC de l'appareil ne doit pas être obstrué ou doit être facilement accessible pendant son utilisation. Pour être complètement déconnecté de l'alimentation d'entrée, l'adaptateur AC/AC de l'appareil doit être déconnecté du secteur. ·minimum distances 10 cm around the apparatus for sufficient ventilations. 10cm de distance minimale autour de l'appareil pour une ventilation suffisante. ·the ventilation should not be impeded by covering the ventilation openings with items such as newspaper, table-cloths, curtains etc. Ne pas recouvrir les entrées d'aérations avec des objets tel qu'un journal, une nappe, un rideau, etc... ·no naked flame sources such as lighted candles should be placed on the apparatus. Aucune source de flamme nue, tel qu'une bougie, ne doit être placée sur l'appareil. ·attention should be drawn to the environmental aspects of battery disposal. Les piles usages doivent être jetées en respectantl'environnement. ·the use of apparatus in tropical and/or moderate climates. L'utilisation de l'appareil dans un climat tropical et/ou modéré LED Decor and Temperature Sensor WARNING Do not ingest the battery,Chemical Burn Hazard This product contains a coin/button cell battery. If the coin/button is swallowed,it can cause severe internal burns in just 2 hours and can lead to death. Keep new and used batteries away from children. If the battery compartment does not close securely,stop using the product and keep it away from children. If you think batteries might have been swallowed or placed inside any part of the body,seek immediate medical attention. ER100104 3 4 ER100104 AL1 AL2 AM TUNE UP /DOWN Button LED ON/OFF Button TEMPERATURE Button 11. SNOOZE/DIMMER Button Qi Wireless Charging Indicator ('slow flashing red'=Charging; 12.Qi Wireless Charging Pad 。 13.Temperature Sensor (-4~176 F) 'fast flashing red'=Charging error; 14. 'steady green'=Charging complete)15.TIME/CLOCK SET Button ALARM1 Button 16.TIME ZONE Button ALARM2 Button 17. 6 Package Contents Read This Insert (Quick Start Guide) until current time zone flashes. Then, release the button and press the "▼" or "▲" button to adjust it to your desired time zone. Press the TIME ZONE button once to complete your new TIME ZONE setting. TIME ZONE TIME USB CHAR. SET ZONE 1 1 WARNING 5 TO PREVENT ELECTRIC SHOCK HAZARD, DO NOT CONNECT TO MAINS POWER SUPPLY WHILE GRILLE IS REMOVED.TO REDUCE THE RISK OF FIRE OR ELECTRIC SHOCK, DO NOT EXPOSE THIS APPARATUS TO 2 RAIN OR MOISTURE. POUR ÉVITER TOUT DANGER DE CHOC ÉLECTRIQUE, NE PAS RACCORDER AU SECTEUR TANT QUE LA GRILLE N'APAS ÉTÉ REMISE EN PLACE.POUR RÉDUIRE LE RISQUE D'INCENDIE OU DE CHOC ÉLECTRIQUE, NE PAS EXPOSER CET APPAREIL SOUS LA PLUIE ET L'HUMIDITÉ. . The lightning flash with arrowhead symbol, within an equilateral triangle is intended to alert the user to the presence of uninsulated 'dangerous voltage' within the product's enclosure that may be of sufficient magnitude to constitute a risk of electric shock to persons. WARNING: TO REDUCE THE RISK OF ELECTRIC SHOOK DO NOT REMOVE COVER (OR BACK),NO USER SERVICEABLE PARTS INSIDE REFER SERVICING TO QUALIFIED SERVICE PERSONNEL. AVIS:RISQUE DE CHOC ELECTRIQUE- NE PAS OUVRIR The exclamation point within an equilateral triangle is intended to alert the user to the presence of important operating and maintenance (servicing) instructions in the literature accompanying the appliance. IMPORTANT SAFETY INSTRUCTIONS 1.) Read these instructions. Keep these instructions. Follow all instructions. Heed all warnings. 2.) Do not use this apparatus near water. 3.) Clean only with dry cloth. 4.) Do not block any ventilation openings. Install in accordance with the manufacturer's instructions. 5.) Do not install near any heat sources such as radiators, heat registers, stoves, or other apparatus (including amplifiers) that produce heat. 6.) Do not defeat the safety purpose of the polarized or grounding-type plug. A polarized plug has two blades with one wider than the other. A grounding type plug has two blades and a third grounding prong. The wide blade or the third prong is provided for your safety. If the provided plug does not fit into your outlet, consult an electrician for replacement of the obsolete outlet. 7.) Protect the power cord from being walked on or pinched particularly at plugs, convenience receptacles, and the point where they exit from the apparatus. 8.) Only use attachments / accessories specified by the manufacturer. 9.) Unplug this apparatus during lightning storms or when unused for long periods of time. 10.) Refer all servicing to qualified service personnel. Servicing is required when the apparatus has been damaged in any way, such as power-supply cord or plug is damaged, liquid has been spilled or objects have fallen into the apparatus, the apparatus has been exposed to rain or moisture, does not operate normally, or has been dropped. 11.) Use only with the cart, stand, tripod, bracket, or table specified by the manufacturer, or sold with the apparatus. When a cart is used, use caution when moving the cart/apparatus combination to avoid injury from tip-over. 12.) The apparatus shall not be exposed to dripping or splashing and that no objects filled with liquids, such as vases, shall be placed on apparatus. 13.) Mains plug is used as disconnect device and it should remain readily operable during intended use. In order to disconnect the apparatus from the mains completely, the mains plug should be disconnected from the mains socket outlet completely. 14.) Battery shall not be exposed to excessive heat such as sunshine, fire or the like. CAUTION: Danger of explosion if battery is incorrectly replaced. Replace only with the same or equivalent type. PRÉCAUTION: Danger d'explosion si les piles sont remplacées de facon incorrect. Remplacer les piles seulement par le méme type de pile ou l'équivalent. FCC Information This equipment has been tested and found to comply with the limits for a Class B digital device, pursuant to Part 15 of the FCC Rules. These limits are designed to provide reasonable protection against harmful interference in a residential installation. This equipment generates, uses, and can radiate radio frequency energy and, if not installed and used in accordance with the instructions, may cause harmful interference to radio communications. However, there is no guarantee that interference will not occur in a particular installation. If this equipment does cause harmful interference to radio or television reception, which can be determined by turning the equipment off and on, the user is encouraged to try to correct the interference by one or more of the following measures: • Reorient or relocate the receiving antenna. • Increase the separation between the equipment and receiver. • Connect the equipment into an outlet on a circuit different from that to which the receiver is connected. • Consult the dealer or an experienced radio/TV technician for help.This device complies with Part 15 of the FCC Rules. Operation is subject to the following two conditions: (1) This device may not cause harmful interference, and (2) This device must accept any interference received, including interference that may cause undesired operation. Changes or modifications not expressly approved by the party responsible for compliance could void the user's authority to operate the equipment. Thank you for purchasing this Emerson SmartSet® Dual Alarm Clock Radio. This clock radio uses Emerson's patented SmartSet® Automatic Time Setting System. The first time you connect this clock radio to your AC outlet, and after every power interruption, within seconds the clock will automatically set itself to the correct Year, Month, Date, Day, and Time. In addition all changes from Standard Time to Daylight Saving Time, and back to Standard Time, are made automatically.There are dual alarms that can be set and used independently, and both of the alarms can be programmed for everyday operation, weekdays only, or weekends only.There is a long life lithium battery installed in this clock radio when you buy it.This battery can maintain the time and alarm settings for 3 to 5 years, or even longer.We have taken every precaution to make sure this radio was in perfect working order when it left our factory. If you encounter any problems with the set up or operation of this item, please call the Emerson Consumer Products Corp.,Customer Service Hotline, toll free, at 1 -800-898-9020. AL1 AL2 AM 17 16 15 14 13 AL1 AL2 DIMMER SNOOZE LIGHT TEMP. Press AL1 AL2 DIMMER LIGHT TEMP. AL1 AL2 AM 7 the Clock Checking the Current Year/Date/Day of Week/Time Settings Press briefly the TIME SET button repeatedly to see the cycle of year, date, day of week (where d1, d2-d7 stand for Monday, Tuesday to Sunday respectively) and time. To resume time display mode, leave it idle for 5 secs. Setting the Year the "TIME SET" the button; Press " " or " " button to adjust Year. Setting the Date Press the "TIME SET" button again and release, the Month will flash. Press the "▼" or "▲" button to adjust the Month. 5 Press the "TIME SET" button again and release, the Date will flash. 12 6 Press the "▼" or "▲" button to adjust the Date. 11 Setting the Time 10 7 Press the "TIME SET" button again and release, the Hour will flash. 8 Press the "▼" or "▲" button to adjust the Hour. 9 9 Press the "TIME SET" button again and release, the Minutes will flash. 10 Press the "▼" or "▲" button to adjust the Minutes. 8 11 Press the "TIME SET" button again or leave it idle for 5 secs to store all the settings, and resume to clock mode
-
 1
1 -
 2
2
 |
 |
