Epic Fitness 1200 Pro Elliptical English Manual - Page 9
first time see HOW TO PLUG IN
 |
View all Epic Fitness 1200 Pro Elliptical manuals
Add to My Manuals
Save this manual to your list of manuals |
Page 9 highlights
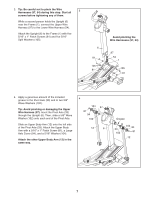
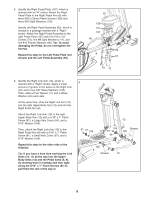
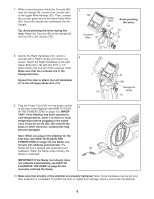
7. While a second person holds the Console (60) near the Upright (6), connect the console wire to the Upper Wire Harness (97). Then, connect the console pulse wire to the Hand Pulse Wire (65). Insert the excess wire downward into the Upright. Tip: Avoid pinching the wires during this step. Attach the Console (60) to the Upright (6) with four #8 x 3/4" Screws (78). 7 60 Console Wire 97 Pulse Wire 65 6 Avoid pinching the wires 78 8. Identify the Right Handlebar (31), which is marked with a "Right" sticker and orient it as 8 shown. Attach the Right Handlebar to the right Upper Body Arm (12) with two 5/16" x 1.5" Button Bolts (73) and two 5/16" Locknuts (106). Make sure that the Locknuts are in the hexagonal holes. Repeat this step to attach the Left Handlebar (7) to the left Upper Body Arm (12). 7 73 12 31 106 Hexagonal Holes 12 9. Plug the Power Cord (55) into the power socket at the rear of the elliptical (see HOW TO PLUG 9 IN THE POWER CORD on page 10). IMPOR- TANT: If the elliptical has been exposed to cold temperatures, allow it to warm to room temperature before plugging in the power cord. If you do not do this, the console dis- plays or other electronic components may become damaged. Note: When you plug in the elliptical for the first time (see HOW TO PLUG IN THE POWER CORD on page 10), the Ramp (not shown) will calibrate automatically. The Ramp will move upward and downward as it 55 calibrates. When the Ramp stops moving, the Ramp is calibrated. IMPORTANT: If the Ramp (not shown) does not calibrate automatically, see HOW TO CALIBRATE THE RAMP on page 20 and manually calibrate the Ramp. 10. Make sure that all parts of the elliptical are properly tightened. Note: Some hardware may be left over after assembly is completed. To protect the floor or carpet from damage, place a mat under the elliptical. 9
-
 1
1 -
2
-
3
-
 4
4 -
 5
5 -
 6
6 -
 7
7 -
 8
8 -
 9
9 -
 10
10 -
 11
11 -
 12
12 -
 13
13 -
 14
14 -
15
-
16
-
17
-
18
-
19
-
20
-
21
-
22
-
23
-
24
-
25
-
26
-
27
-
28
 |
 |
