Epson 1250 Product Information Guide - Page 4
Selecting TWAIN Settings, Scanner Light, Reference Guide, Start Here, Scanner, Basics, User's Manual - perfection scanner software
 |
UPC - 010343836976
View all Epson 1250 manuals
Add to My Manuals
Save this manual to your list of manuals |
Page 4 highlights
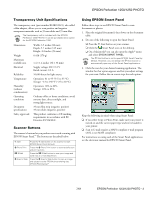
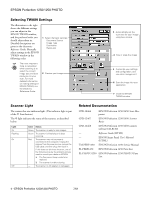
EPSON Perfection 1250/1250 PHOTO Selecting TWAIN Settings The illustration to the right shows the different settings you can adjust in the EPSON TWAIN window, and the preferred order you should adjust them in. Detailed descriptions are given in the electronic Reference Guide. Manually adjust settings in the EPSON TWAIN window in the following order: 1 Select the basic settings: Document Source Image Type Destination Resolution The most important thing to remember when scanning is to select the correct image type and best resolution for your scan. For more detailed information on making settings in EPSON TWAIN, see the electronic Reference Guide. 2 Preview your image 3 Automatically set the scan area for your image using Auto Locate 4 Size or scale the image 5 Customize your settings and configuration, and use color management 6 Scan the image into your application 7 Close the EPSON TWAIN window Scanner Light The scanner has one indicator light. (The indicator light is part of the ] Start button.) The ] light indicates the status of the scanner, as described below. Light On Flashing On Off Color Status Green The scanner is ready to scan images. Green The scanner is initializing or is busy scanning. Red The scanner may not be properly connected to the computer. Unplug the scanner from its power source, remove the USB cable, and then plug them back in. If this does not eliminate the error, one of the following may be the problem and you need to consult your dealer or EPSON: ❏ The fluorescent lamp needs to be replaced. ❏ The scanner is malfunctioning. - The scanner or AC adapter is unplugged. Related Documentation CPD-12466 EPSON Perfection 1250/1650 Start Here poster CPD-12467 EPSON Perfection 1250/1650 Scanner Basics CPD-12468 EPSON Perfection 1250/1650 scanner software CD-ROM - Reference Guide (HTML) - EPSON Smart Panel User's Manual (HTML) TM-PERF1250 EPSON Perfection 1250 Service Manual PL-PERF1250 EPSON Perfection 1250 Parts List PL-PHOTO1250 EPSON Perfection 1250 PHOTO Parts List 4 - EPSON Perfection 1250/1250 PHOTO 7/01
-
 1
1 -
 2
2 -
 3
3 -
 4
4
 |
 |
