Epson 1250 Start Here Card - Page 1
Epson 1250 - Perfection Photo Flatbed Scanner Manual
 |
UPC - 010343836976
View all Epson 1250 manuals
Add to My Manuals
Save this manual to your list of manuals |
Page 1 highlights
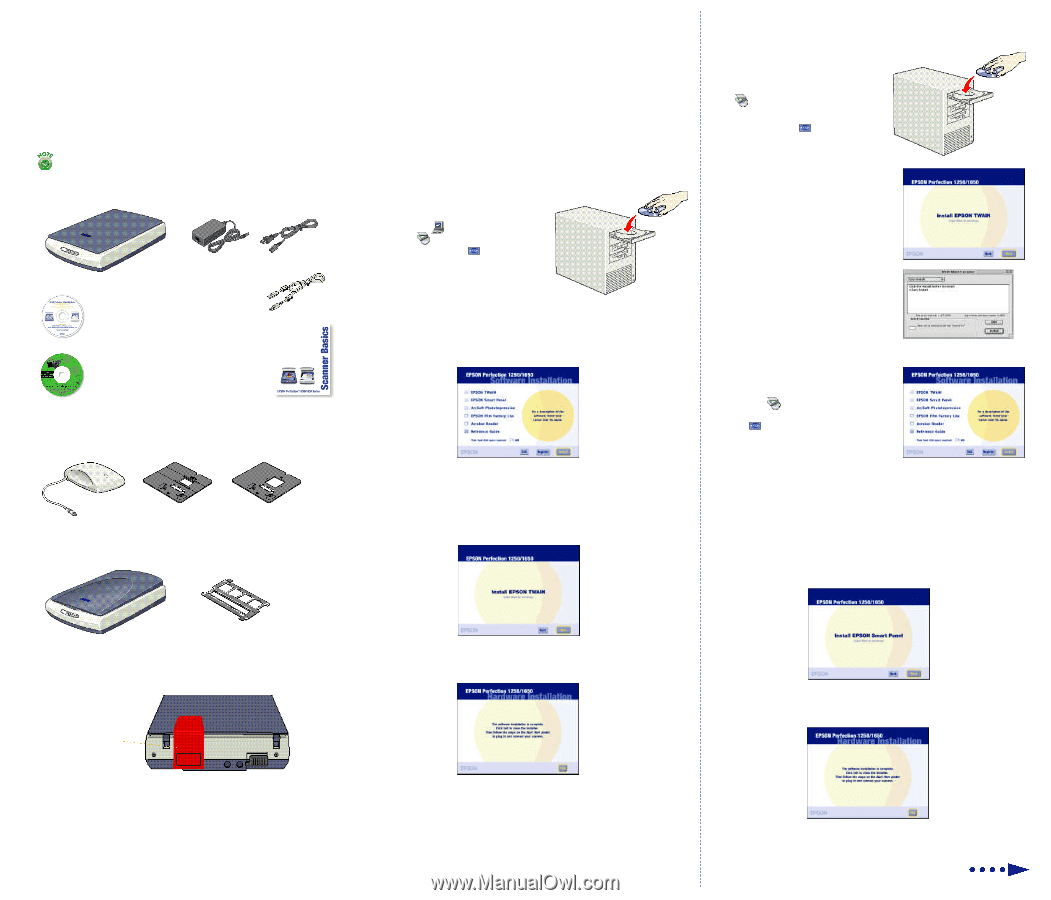
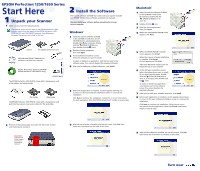
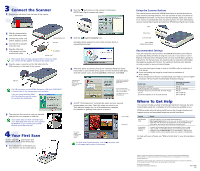
EPSON Perfection® 1250/1650 Series SSttaartrtHeHreere 11Unpack your Scanner 1 Make sure you have the following items: The scanner shown on this sheet is the EPSON Perfection 1650, but the instructions also apply to the EPSON Perfection 1250, 1250 PHOTO, and 1650 PHOTO scanners. Any differences between the versions are noted in the text. scanner AC adapter and power cord CD-ROM with EPSON® TWAIN driver, software, and electronic manuals USB cable Adobe® Photoshop® Elements CD-ROM (EPSON Perfection 1650 PHOTO only) Scanner Basics The EPSON Perfection 1250 PHOTO comes with a transparency unit, a film holder, and a slide holder. 22Install the Software The scanner software CD-ROM that comes with your scanner includes your EPSON TWAIN driver, software, and electronic manuals. You must install your software before connecting the scanner to your computer. Windows® 1 Insert the scanner software CD-ROM in the CD-ROM or DVD drive. (If the CD-ROM doesn't automatically start, double-click My Computer, doubleclick the EPSON CD-ROM icon, then double-click the icon.) 2 Read the license agreement, then click Agree. 3 At the Software Installation screen, select the software you want to install. To select or deselect an application, click the box next to the software name. (You cannot deselect the required software.) 4 After you've made your software selections, click Install. film holder slide holder The EPSON Perfection 1650 PHOTO comes with a transparency unit built into the scanner cover and a holder for film and slides. 5 Before each application is installed, a screen appears allowing you to return to the main Software Installation screen or continue the installation. Click Next to continue the installation. Follow the on screen instructions for each application. Note that EPSON Smart Panel™ installs in several steps. Macintosh® 1 Insert the scanner software CD-ROM in the CD-ROM or DVD drive. (If necessary, double-click the EPSON CD-ROM icon to open it.) 2 Double-click the icon. 3 Read the license agreement, then click Agree. 4 When the Install EPSON TWAIN screen appears, click Next. 5 When the EPSON TWAIN 5 Installer screen appears, click Install. When the scanner software installation is complete, click Restart. Do not remove your CD-ROM. After your Macintosh restarts, you can install the rest of your software. 6 At the Software Installation screen, select the software you want to install. (If you don't see this screen, doubleclick the EPSON CD-ROM icon to open it, if necessary, then double-click the icon.) To select or deselect an application, click the box next to the software name. (You cannot deselect the required software.) 7 After you've made your software selections, click Install. 8 Before each application is installed, a screen appears allowing you to return to the main Software Installation screen or continue the installation. Click Next to continue the installation. Follow the on screen instructions for each application. Note that EPSON Smart Panel installs in several steps. 2 Remove all the packing tape, but leave the red sticker in place until instructed to remove it. IMPORTANT! Leave the red sticker in place until you are instructed to remove it. 6 After all the software is installed, you see this screen. Click Exit, then follow the instructions on the back of this sheet. 9 After all the software is installed, you see this screen. Click Exit, then follow the instructions on the back of this sheet. Turn over
-
 1
1 -
 2
2
 |
 |