Epson 1280 Using EPSON ColorLife Photo Paper - Page 2
color, black and white - color ink
 |
UPC - 010343844230
View all Epson 1280 manuals
Add to My Manuals
Save this manual to your list of manuals |
Page 2 highlights
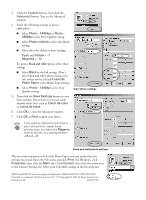
3. Click the Custom button, then click the Advanced button. You see the Advanced window. 4. Select the following settings to print a color photo: I Select Photo - 1440dpi or Photo 2880dpi as the Print Quality setting. I Select Photo-realistic as the color Mode setting. I Move the color sliders to these settings: Cyan and Yellow = -7 Magenta = -12 To print a black and white photo, select these settings: I Select Black as the Ink setting. (Don't print black and white photos using color ink, unless you've selected ColorLife Photo Paper as the Media Type setting.) I Select Photo - 1440dpi as the Print Quality setting. Color photo settings 5. Now click the Save Settings button to save these settings. Name them so you can easily identify them later, such as ColorLife-color or ColorLife-black. 6. Click OK to close the Advanced window. 7. Click OK or Print to print your photo. If you need to reduce the red tones in your color printout, repeat these printing steps, but adjust the Magenta slider to the left, to a setting between -13 and -17. Black and white photo settings The next time you print on ColorLife Photo Paper, you can easily select the settings you saved. Open the File menu and click Print. (In Windows, click Properties, then click the Main tab.) Click Custom, then click the arrow next to the Custom Settings list. Select your ColorLife settings in the list and print. EPSON and EPSON Stylus are registered trademarks of SEIKO EPSON CORPORATION. ColorLife is a trademark of Epson America, Inc. 7/01 Copyright © 2001 by Epson America, Inc. Printed in USA CPD-12772
-
 1
1 -
 2
2
 |
 |
