Epson 1700C User's Guide - Page 35
Connecting the Cable for Remote Mouse Control, running Windows XP, 98SE, Me, or 2000
 |
UPC - 010343858299
View all Epson 1700C manuals
Add to My Manuals
Save this manual to your list of manuals |
Page 35 highlights
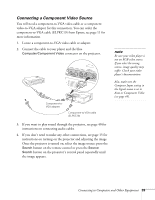
3. When you've finished making any connections, see page 15 for instructions on turning on the projector and adjusting the image. Connecting the Cable for Remote Mouse Control If you've connected a computer as described in this chapter (using the Computer/Component Video port) and set the USB Type B setting under the projector's Extended menu to Link21L (see page 58), you can use the projector's remote control as a wireless mouse. This lets you control your computer and click through slideshow-style presentations, such as PowerPoint, from up to 20 feet away. The wireless mouse function is supported on systems with a USB port running Windows XP, 98SE, Me, or 2000, or Mac OS X 10.2.x to 10.4.x. This function is not supported if you use an S-Video cable to connect your computer to the projector. 1. Locate the USB cable that came with your projector. 2. Connect the square end of the cable to the projector's USB port. note The remote mouse control function may not operate correctly on systems that have been upgraded from an earlier version of Windows. note For details on how to use the remote control in place of your computer's mouse, see page 31. USB cable 3. Connect the flat end of the cable to any available USB port on your notebook or desktop computer. 4. If necessary, configure your computer to work with an external USB mouse. See your computer documentation for details. Leftclick Move cursor Rightclick Connecting to Computers and Other Equipment 35
-
 1
1 -
2
-
3
-
4
-
5
-
6
-
7
-
8
-
9
-
10
-
11
-
12
-
13
-
14
-
15
-
16
-
17
-
18
-
19
-
20
-
21
-
22
-
23
-
24
-
25
-
26
-
27
-
28
-
29
-
 30
30 -
 31
31 -
 32
32 -
 33
33 -
 34
34 -
 35
35 -
 36
36 -
 37
37 -
 38
38 -
 39
39 -
 40
40 -
41
-
42
-
43
-
44
-
45
-
46
-
47
-
48
-
49
-
50
-
51
-
52
-
53
-
54
-
55
-
56
-
57
-
58
-
59
-
60
-
61
-
62
-
63
-
64
-
65
-
66
-
67
-
68
-
69
-
70
-
71
-
72
-
73
-
74
-
75
-
76
-
77
-
78
-
79
-
80
-
81
-
82
-
83
-
84
-
85
-
86
-
87
-
88
-
89
-
90
-
91
-
92
-
93
-
94
-
95
-
96
-
97
-
98
-
99
-
100
-
101
-
102
 |
 |
