Epson 1815p Product Support Bulletin(s) - Page 42
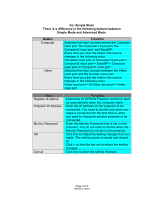
Standby Mode. If the Standby Mode is set to Network ON, set it to Network Off, - powerlite lamp
 |
UPC - 010343858190
View all Epson 1815p manuals
Add to My Manuals
Save this manual to your list of manuals |
Page 42 highlights
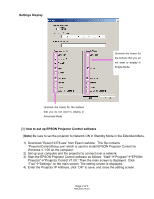
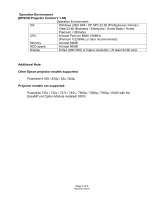
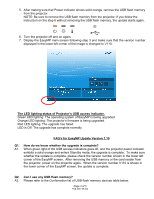
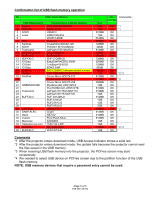
S/N for projectors with the EasyMP V.1.10 firmware installed Below are the starting serial numbers of units that ship with Firmware V.1.10. Pre-installed: Model Serial Number PowerLite 1715c JHZG730647F PowerLite 1705c JJKG730217F PowerLite 1815p JV2F730001L NOTE: The EasyMP version of the PowerLite 1815p projectors is already V.1.10 for all PowerLite 1815p projectors. Therefore the PowerLite 1815p projectors do not need the V.1.10 firmware upgrade. Download procedure Preparing the computer Download the firmware update file, epson12312.exe to the PC. This file is a self-extracting archive and will decompress to C:\EPSON\epson12312_easymp_110. Copy the firmware update files to the root directory of a USB Thumbdrive (flash memory). Note: Make sure that the root directory of the flash memory only has the 2 firmware update files on it; no other files or folders should exist on the USB memory device. Preparing projector Note: Do not unplug the power cord or remove the USB device before the upgrade is complete. If the firmware update procedure is interrupted for any reason, before the procedure is complete, it may render the projector unusable. If this occurs you will need to contact Epson or take your projector to an authorized Epson Customer Care Center. 1. Power on the projector. 2. Make sure that the projector is set to "Network Off" by clicking, Menu ->Extended -> Standby Mode. If the Standby Mode is set to "Network ON", set it to "Network Off", and turn the projector off and on. NOTE: If you attempt to run the firmware upgrade with the projector set to "Network On", then the projector will be stuck in a loop and will continue to run the update. In this case, remove the USB flash memory at the moment that the green light of USB access indicator goes off. 3. Display the EasyMP main screen by pushing EasyMP button on the remote control. 4. Connect the USB flash memory to USB port Type A on the projector. A Black screen is displayed. The projector enters download mode while making the 3 LED indicators (Power, Lamp and Temp indicators) show solid orange. After a while, the USB access indicator lights green and the update will start. When the update is complete, the green light of USB access indicator goes off. NOTES: USB access indicator lights green a few seconds after Power, Lamp and Temp LED's show solid orange. Don't remove the USB flash memory during the updating (USB access indicator is lit.) Page 2 of 5 PSB.2007.06.002
-
 1
1 -
2
-
3
-
4
-
5
-
6
-
7
-
8
-
9
-
10
-
11
-
12
-
13
-
14
-
15
-
16
-
17
-
18
-
19
-
20
-
21
-
22
-
23
-
24
-
25
-
26
-
27
-
28
-
29
-
30
-
31
-
32
-
33
-
34
-
35
-
36
-
 37
37 -
 38
38 -
 39
39 -
 40
40 -
 41
41 -
 42
42 -
 43
43 -
 44
44 -
 45
45
 |
 |