Epson 585W Installation Guide - Ultra-Short Throw Wall Mount (ELPMB43) - Page 17
Installation worksheet for projecting on a pre-installed wall-mounted board
 |
View all Epson 585W manuals
Add to My Manuals
Save this manual to your list of manuals |
Page 17 highlights
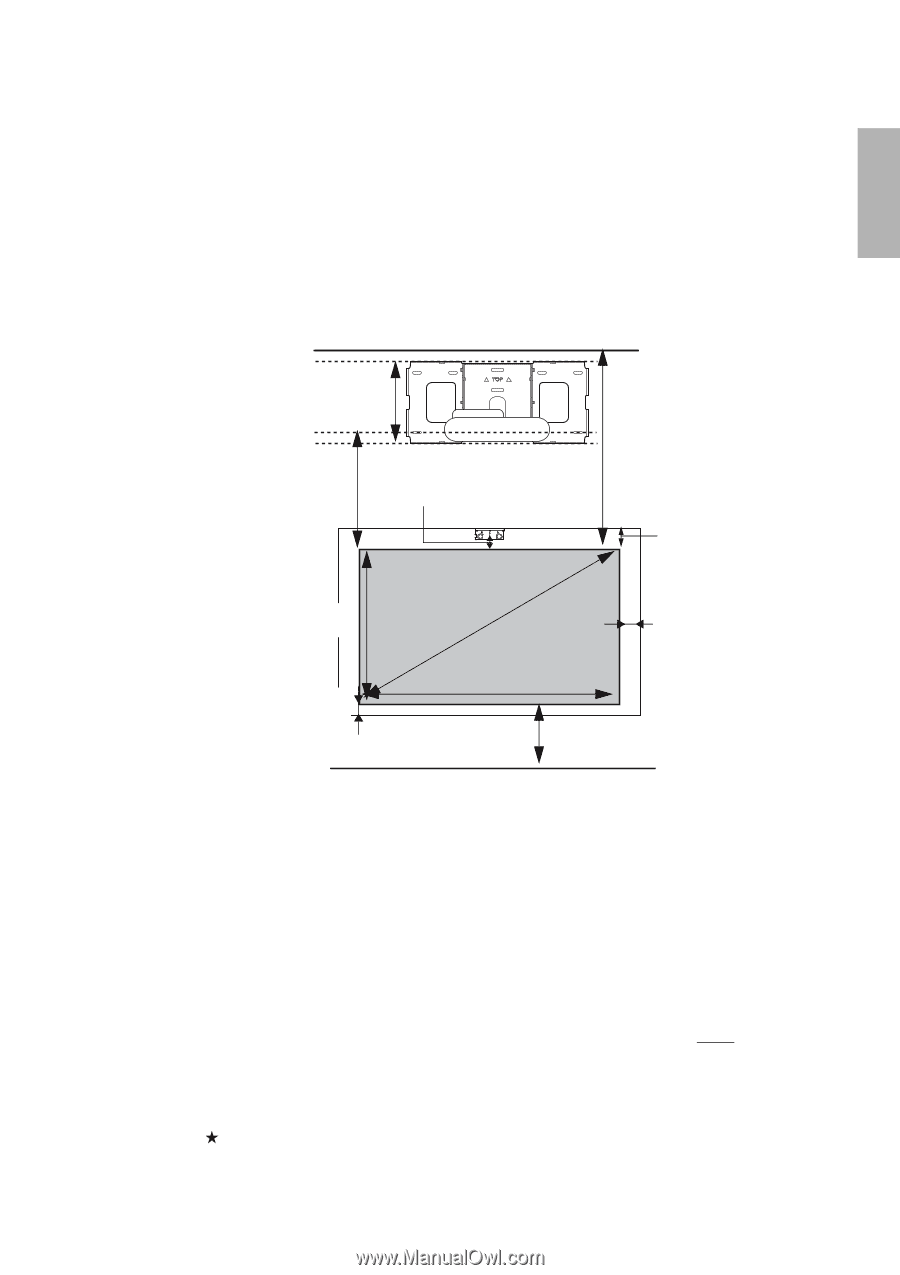
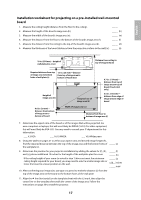
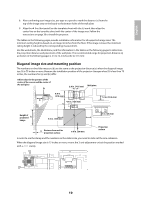
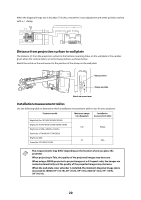
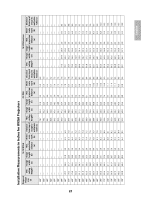
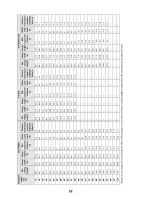
English Installation worksheet for projecting on a pre-installed wall-mounted board 1. Measure the ceiling height (distance from the floor to the ceiling). _____ 2. Measure the height of the board's image area (h). _____ (h) 3. Measure the width of the board's image area (w). _____ (w) 4. Measure the distance from the floor to the bottom of the board's image area (f ). _____ (f ) 5. Measure the distance from the ceiling to the top of the board's image area (d). _____ (d) 6. Measure the thickness of the board (distance from the projection surface to the wall) (x). _____ (x) 10 in. (254 mm)-height of wall plate plus cover Distance from ceiling to top of image area (d) Required distance from top of image area to bottom holes of wall plate (c) 1.0 in. (25 mm)-distance from top of image area to bottom of Touch Unit Height of image area (h) Diagonal size of image area (S) 4.7 in. (119 mm)- distance from top of image area to top of board (Touch Unit only) 4.0 in. (100 mm)- distance from edge of image area to edge of board 0.8 in. (20 mm)- distance from bottom of image area to bottom of board Width of image area (w) Distance from floor to bottom of image area (f) 7. Determine the aspect ratio of the board or of the images that will be projected. For new computers or laptops, this will most likely be WXGA (16:10). For older equipment, this will most likely be XGA (4:3). You may need to consult your IT department for this information. ___ 4:3 XGA ___ 16:10 WXGA ___ 16:9 Widescreen 8. Using the tables on pages 21 to 28 for your aspect ratio and desired image height (h), find the required distance between the top of the image area and the bottom holes of _____ (c) the wall plate (c). 9. Determine the position for your projector installation by adding the values for (f), (h), _____ (f ) and (c), plus an additional 10 inches for the height of the wall plate plus the cover. _____ (h) If the ceiling height of your room (as noted in step 1) does not meet the minimum ceiling height required for your board, you may need to select a smaller image size or move the board to a lower position on the wall. _____ (c) +10 inches _____ total 10. After confirming your image size, use tape or a pencil to mark the distance (c) from the top of the image area on the board to the bottom holes of the wall plate. 11. Align the line (horizontal) on the template sheet with the (c) mark, then align the center line on the template sheet with the center of the image area. Follow the instructions on page 30 to install the projector. 17
-
 1
1 -
2
-
3
-
4
-
5
-
6
-
7
-
8
-
9
-
10
-
11
-
 12
12 -
 13
13 -
 14
14 -
 15
15 -
 16
16 -
 17
17 -
 18
18 -
 19
19 -
 20
20 -
 21
21 -
 22
22 -
23
-
24
-
25
-
26
-
27
-
28
-
29
-
30
-
31
-
32
-
33
-
34
-
35
-
36
-
37
-
38
-
39
-
40
-
41
-
42
-
43
-
44
-
45
-
46
-
47
-
48
-
49
-
50
-
51
-
52
-
53
-
54
-
55
-
56
-
57
-
58
-
59
-
60
-
61
-
62
-
63
-
64
-
65
-
66
-
67
-
68
-
69
-
70
-
71
-
72
-
73
-
74
-
75
-
76
-
77
-
78
-
79
-
80
-
81
-
82
-
83
-
84
-
85
-
86
-
87
-
88
-
89
-
90
-
91
-
92
-
93
-
94
-
95
-
96
-
97
-
98
-
99
-
100
-
101
-
102
-
103
-
104
-
105
-
106
-
107
-
108
-
109
-
110
-
111
-
112
-
113
-
114
-
115
-
116
-
117
-
118
-
119
-
120
-
121
-
122
-
123
-
124
-
125
-
126
-
127
-
128
-
129
-
130
-
131
-
132
-
133
-
134
-
135
-
136
-
137
-
138
-
139
-
140
 |
 |