Epson 697Ui Installation Guide - Ultra-Short Throw Wall Mount ELPMB46 - Page 4
Installation Location
 |
View all Epson 697Ui manuals
Add to My Manuals
Save this manual to your list of manuals |
Page 4 highlights
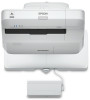
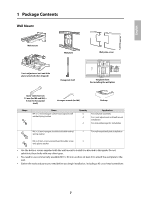
Installation Location • Before installing the projector, verify the power supply wiring for the installation location. • Install the projector away from other electric devices such as fluorescent lights or air conditioners. Some kinds of fluorescent lights could interfere with the remote control of the projector. • Install the projector away from direct sunlight and other bright light sources. • It is recommended to keep VGA computer cable length less than 65 feet (20 meters) to reduce external noise. • Install the projector at an angle of no more than 3° horizontally or vertically in relation to the projection surface. • Install the projector in a location where the projected image is within reach. • The projector must be installed in one of the following locations in order for the Touch Unit to function properly (if applicable): • Mounted on a wall or suspended from the ceiling with images projected from in front of the screen. • Mounted vertically on a table with images projected from the front of the table. If using this installation method, you need the optional interactive table mount (ELPMB29). • When powering the Control Pad using batteries (if applicable), verify that the installation location meets the following conditions: • Install the Control Pad on the same surface as the projection screen. If the projection screen and the Control Pad installation point are uneven, install the Control Pad approximately 8 inches (20 cm) from the edge of the screen. • Make sure there are no obstacles between the Control Pad and the projector (not including the Touch Unit). • Use the optional remote control cable set (model ELPKC28, part number V12H005C28) to supply power to the Control Pad in the following situations: • The required conditions above are not met. • The projection screen and the Control Pad installation point are uneven and the difference in height is more than 2 inches (5 cm). • The projector is placed on a table and projecting to the screen. • Multiple projectors are being used. 4
-
 1
1 -
 2
2 -
 3
3 -
 4
4 -
 5
5 -
 6
6 -
 7
7 -
 8
8 -
 9
9 -
 10
10 -
11
-
12
-
13
-
14
-
15
-
16
-
17
-
18
-
19
-
20
-
21
-
22
-
23
-
24
-
25
-
26
-
27
-
28
-
29
-
30
-
31
-
32
-
33
-
34
-
35
-
36
-
37
-
38
-
39
-
40
-
41
-
42
-
43
-
44
-
45
-
46
-
47
-
48
-
49
-
50
-
51
-
52
-
53
-
54
-
55
-
56
-
57
-
58
-
59
-
60
-
61
-
62
-
63
-
64
-
65
-
66
-
67
-
68
-
69
-
70
-
71
-
72
-
73
-
74
-
75
-
76
-
77
-
78
-
79
-
80
-
81
-
82
-
83
-
84
-
85
-
86
-
87
-
88
-
89
-
90
-
91
-
92
-
93
-
94
-
95
-
96
 |
 |