Epson 740c Product Information Guide - Page 12
Replacing the Lamp, Warning, Caution
 |
UPC - 010343851214
View all Epson 740c manuals
Add to My Manuals
Save this manual to your list of manuals |
Page 12 highlights
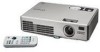
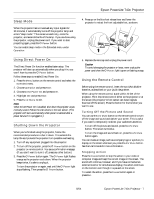
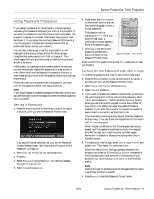
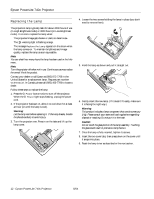
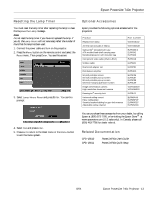
Epson PowerLite 740c Projector Replacing the Lamp The projection lamp typically lasts for about 2000 hours of use (in High Brightness mode) or 3000 hours (in Low Brightness mode). It is time to replace the lamp when: ❏ The projected image gets darker or starts to deteriorate. ❏ The warning light is flashing orange. ❏ The message Replace the Lamp appears on the screen when the lamp comes on. To maintain brightness and image quality, replace the lamp as soon as possible. Note: You can check how many hours the lamp has been used in the Info menu. Note: Turn the projector off when not in use. Continuous use may reduce the overall life of the product. Contact your dealer or call Epson at (800) 873-7766 in the United States for a replacement lamp. Request part number V13H010L32. In Canada, please call (800) 463-7766 to locate a dealer. Follow these steps to replace the lamp: 1. Press the P Power button twice to turn off the projector. When the P Power light stops flashing, unplug the power cord. 2. If the projector has been on, allow it to cool down for at least an hour (or until the lamp is cool). Warning: Let the lamp cool before replacing it. If the lamp breaks, handle the shards carefully to avoid injury. 3. Turn the projector over. Press in on the tabs and lift up the lamp cover. 4. Loosen the two screws holding the lamp in place (you don't need to remove them). 5. Hold the lamp as shown and pull it straight out. 6. Gently insert the new lamp. (If it doesn't fit easily, make sure it is facing the right way.) Warning: This product includes a lamp component that contains mercury (Hg). Please consult your state and local regulations regarding disposal or recycling. Do not put it in the trash. Caution: Do not touch the glass portion of the lamp assembly. Touching the glass could result in premature lamp failure. 7. Once the lamp is fully inserted, tighten its screws. 8. Insert the two cover tabs, then press down on the cover until it snaps into place. 9. Reset the lamp timer as described in the next section. 12 - Epson PowerLite 740c Projector 8/04
-
 1
1 -
2
-
3
-
4
-
5
-
6
-
 7
7 -
 8
8 -
 9
9 -
 10
10 -
 11
11 -
 12
12 -
 13
13
 |
 |