Epson 821p Product Information Guide - Page 9
Using Password Protection, Setting a Password, Turning On the Password and User’s Logo - unlock
 |
UPC - 010343852020
View all Epson 821p manuals
Add to My Manuals
Save this manual to your list of manuals |
Page 9 highlights
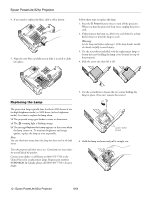
Epson PowerLite 821p Projector Using Password Protection If you assign a password for the projector, a screen appears requesting the password whenever you turn on the projector. If you enter the password incorrectly three times in succession, the projector's operation is locked. Disconnect the projector and reconnect it. If you enter the incorrect password 30 times in a row, the projector is locked and remains locked until an authorized Epson servicer can unlock it. You can also create a user's logo for the projector, to be displayed as the startup screen and/or AV/Mute screen. Unauthorized users cannot turn it off or change it. This discourages theft and provides a way to identify the projector should it be stolen. Additionally, to make sure a borrowed projector is returned, you can temporarily disable the password for a set period of time. When that time has elapsed, the password function is reactivated and you must enter the password before you can use the projector. Follow the instructions below to first set the password, and then turn on the password and/or user logo protection. Note: If you should happen to enable the password before you set one, and you see the prompt to enter the password, enter the default password 0000 to proceed. Setting a Password 1. Press the Freeze button on the remote control for about 5 seconds, until you see the Password Protect menu: If a password has already been set, you see the Password Protect Release screen. See "Starting the Projector with a Password" on page 10. 2. Select Password and press Enter. You see the message Change the password? 3. Select Yes and press Enter. 4. Hold down the Num button on the remote control and use the numeric keypad to enter a 4-digit password. The password will be displayed as ****. After you enter the last digit, a confirmation screen appears. Enter the password again. 5. After you finish setting the password, press the Esc button to return to the Password Protect menu. Numeric keypad Num button Make a note of the password and keep it in a safe place in case you forget it. Turning On the Password and User's Logo To enable the password and User's Logo, follow these steps: 1. Press the Freeze button on the remote control for about 5 seconds until you see the Password Protect menu. 2. Select Power ON Protect and press Enter. 3. Select ON and press Enter. Then press Esc. 4. If you want to disable the password temporarily so someone can use the projector without entering the password, select Timer and press Enter. Then hold down the Num button while you use the numeric keypad to enter the number of hours (from 0 to 9999) you want the password feature disabled. If you want the projector to request the password every time it is turned on, set the timer to 0H. The timer starts counting as soon as you close the Password Protect menu. (You can check the elapsed time in this menu next to Time elapsed.) When the period defined in the Time-elapsed setting has passed, and the password is entered correctly, the elapsed time will be reset to 0H and the timer will start again. Remember to disable or change this setting when you're finished using it. 5. To enable your screen logo, select User's Logo Protect and press Enter. Then select ON and press Enter. When this feature is on, the logo appears whenever the projector is turned on (if the Startup Screen is enabled in the Extended menu) and as the A/V Mute screen (if you selected Logo as the Background Color in the Extended menu). Note: None of the User's Logo features can be changed when the User's Logo Protect function is enabled. 6. Press Menu to close the Password Protect menu. 9/04 Epson PowerLite 821p Projector - 9
-
 1
1 -
2
-
3
-
 4
4 -
 5
5 -
 6
6 -
 7
7 -
 8
8 -
 9
9 -
 10
10 -
 11
11 -
 12
12 -
 13
13 -
 14
14
 |
 |
