Epson 835p Quick Start - Page 1
Epson 835p - PowerLite XGA LCD Projector Manual
 |
UPC - 010343851160
View all Epson 835p manuals
Add to My Manuals
Save this manual to your list of manuals |
Page 1 highlights
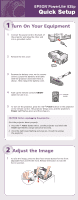
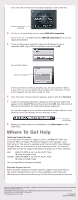
EPSON® PowerLite® 835p Quick Setup 1 Turn On Your Equipment 1 Connect the power cord to the back of the projector and plug the other end into a grounded outlet. 2 Remove the lens cover. 3 Remove the battery cover on the remote control. Locate the batteries that came with the projector and insert them as shown. Then replace the battery cover. 4 Push up the remote control's ON/OFF switch to turn it on. ON/OFF switch 5 To turn on the projector, press the red Power button on the projector or the remote control. The projector beeps once, and the projector's Power light flashes green and then stays on. CAUTION: Before unplugging the projector... Shut the projector down properly: 1. Press the Power button twice. Let the projector cool while the Power light flashes orange (about 30 seconds). 2. Once the light stops flashing and stays on, it's safe to unplug the projector. 2 Adjust the Image 1 To raise the image, press the blue foot release button for the front adjustable foot and lift the front. Release the button to lock the foot in position.
-
 1
1 -
 2
2 -
 3
3 -
 4
4
 |
 |
