Epson ActionPrinter 2250 Product Information Guide - Page 10
Table A: Language selection
 |
View all Epson ActionPrinter 2250 manuals
Add to My Manuals
Save this manual to your list of manuals |
Page 10 highlights
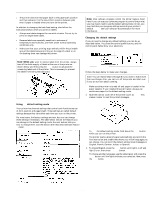
ActionPrinter 2250 Table A: Language selection .- Language Light 1 Light 2 English OFF ON French OFF BLINK German ON OFF - Italian ON ON Spanish ON BUNK Once you press the LF/FF button, the printer prints the current default settings and the next instruction in the selected language After printing is finished, go to the next step. 5. If you want more help text to be printed, press the FONT button. After printing is finished, go to the next step. If you don't want the help text, press the LF/FF button. You can then go to the next step immediately. Note: When you first use the default-setting mode, it's a good idea to press the FONT button to print the help text before changing default settings. The printed text guides you through the operation. Once you are familiar with the operation, press the ; LF/FF button to skip printing. _ 2 ..-. 6. Use Table B to choose the feature you want to change. Then press the FONT button as many times as necessary until lights 1 and 2 match your selection. Table B: Default settings Table C: Character table Table D: Page length 7. Press the LF/FF button to change the setting. The READY light turns on or off to show your selection, as indicated in Table B, and your new setting is saved automatically and remains in effect until you change it. If you are changing the character table, page length, or TOF position, go to step 8 next. Otherwise, go to step 9. 8. If you are changing the character table, page length, or TOF position, you must make additional settings as shown in the tables below. Press the LF/FF button until light 1, light 2, and the READY light indicate your selection. Then press the FONT button to set the feature. Once you press the FONT button, the printer advances to the next item in table B and your setting is saved automatically. The new setting remains in effect until you change it. AP-2250-10 7/14/92 Q-Pin Printers
-
 1
1 -
2
-
3
-
4
-
 5
5 -
 6
6 -
 7
7 -
 8
8 -
 9
9 -
 10
10 -
 11
11 -
 12
12
 |
 |
