Epson Artisan 1430 Start Here - Page 3
Connection options, Any problems? - manual
 |
View all Epson Artisan 1430 manuals
Add to My Manuals
Save this manual to your list of manuals |
Page 3 highlights
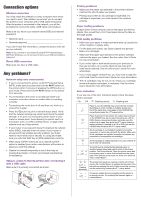
Connection options Wireless connection You must install the software on every computer from which you want to print. The installer may prompt you to connect the printer to your computer with a USB cable temporarily. After the printer is connected to the network, you will be prompted to remove the cable. (USB cable not included.) Make sure you know your network name (SSID) and network password: • Network name • Network password If you don't have this information, contact the person who set up your network. Note: If you connect to your network using Wi-Fi Protected Setup (WPS) on Windows, you do not need to know your SSID and network password. Direct USB connection Make sure you have a USB cable. Any problems? Network setup was unsuccessful. • If you're connecting the printer via Wi-Fi Protected Setup (WPS), make sure you press and hold the Wi-Fi button on the printer within 2 minutes of pressing the WPS button on your router. Press and hold the Wi-Fi button on the printer for 3 seconds. • Try connecting to the router or access point with your computer or another device to confirm that it is working correctly. • Try resetting the router (turn it off and then on), then try to connect to it again. • Press the button to print a network status sheet. Verify that the network settings are correct and check the signal strength. If it's poor, try moving the printer closer to your router or access point. Avoid placing the printer next to a microwave oven, 2.4 GHz cordless phone, or large metal objects such as a filing cabinet. • If your router or access point doesn't broadcast its network name (SSID), manually enter the name. If your router or access point has wireless security enabled, you'll also need to know what kind of security it's using and make sure you enter the WEP key or WPA passphrase correctly. • When using TCP/IP, make sure your network's DHCP option is enabled (your router manufacturer will be able to assist you with this setting). • Disable the firewall temporarily to see if that may be causing the problem. Contact your firewall manufacturer for assistance. Setup is unable to find my printer after connecting it with a USB cable. Make sure it is securely connected as shown: Printing problems • Make sure the paper size selected in the printer software matches the size of paper you loaded. • Printing stops when an ink cartridge is expended. If a cartridge is expended, you must replace it to continue printing. Paper feeding problems If paper doesn't feed correctly, remove the paper and fan the sheets, then reload them. Don't load paper above the tabs on the edge guides. Print quality problems • Make sure your paper is loaded printable side up (usually the whiter, brighter, or glossy side). • For the best print quality, use Epson papers and genuine Epson ink cartridges. • Make sure the paper type selected in the printer software matches the paper you loaded. See the online User's Guide for more information. • If you notice light or dark bands across your printouts or they are too faint, run a nozzle check to see if the print head needs cleaning. See the online User's Guide for more information. • If you notice jagged vertical lines, you may need to align the print head. See the online User's Guide for more information. • The ink cartridges may be low on ink. Check your cartridge levels and replace cartridges, if necessary. See the online User's Guide for more information. Error indicators If you see one of the error indicators below, follow the steps here to proceed: On Off Flashing slowly Flashing fast Paper is out, the CD/DVD tray is not inserted correctly (if printing on a CD or DVD), or multiple sheets have fed at the same time. Load paper or the CD/DVD tray correctly and press the paper button. Paper is jammed in the printer, the output tray is closed, or the CD/DVD tray did not eject (if printing on a CD or DVD). Remove any jammed paper and make sure the output tray is open, then press the paper button to resume printing. If printing on a CD or DVD, pull out the CD/DVD tray and press the paper button. An ink cartridge is not installed, installed incorrectly, expended, or cannot be used with the printer. Make sure all ink cartridges are installed correctly and replace any expended or incompatible ink cartridges. An ink cartridge is nearly expended. You can continue to use it until it is expended. The print head is obstructed by jammed paper or another foreign object and cannot return to the home position. Turn the printer off. Open the printer cover and remove any paper or other obstructions from the paper path. Then turn the printer back on. If the error does not clear, contact Epson. Flashing alternately The printer's ink pads are nearing or at the end of their service life. Contact Epson to replace the ink pads. If the ink pads are nearing the end of their service life, printing can be resumed by pressing the paper button. A firmware update did not complete and the printer is in recovery mode. Try updating the firmware again or contact Epson.
-
 1
1 -
 2
2 -
 3
3 -
 4
4
 |
 |
