Epson BrightLink 436Wi Welcome Kit - Page 10
Use PC Free Annotation, Ready to Learn More?
 |
View all Epson BrightLink 436Wi manuals
Add to My Manuals
Save this manual to your list of manuals |
Page 10 highlights
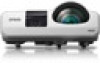
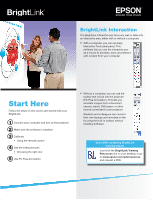
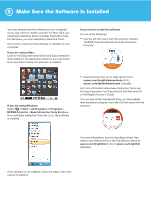
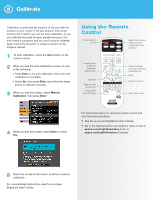
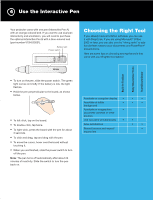
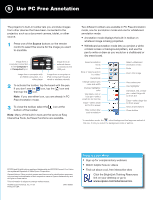
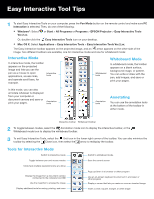
5 Use PC Free Annotation The projector's built-in toolbar lets you annotate images from other devices that have been connected to the projector, such as a document camera, tablet, or other source. 1 Press one of the Source buttons on the remote control to select the source for the image you want to annotate. Image from a computer connected to the Computer1 or Computer2 port Image from a computer with an HDMI connection, or a video player Image from an external device connected to the USB port Image from a computer or iPad connected through a wired or wireless network 2 To activate the toolbar, tap the board with the pen. If you don't see the icon, tap the icon and then tap the icon. Note: If you see either icon, you are already in PC Free Annotation mode. 3 To close the toolbar, select the bottom of the toolbar. icon at the Note: Many of the built-in tools are the same as Easy Interactive Tools, but fewer functions are available. Two different toolbars are available in PC Free Annotation mode, one for annotation mode and one for whiteboard annotation mode. • Annotation mode displays the built-in toolbar on whatever image is being projected. • Whiteboard annotation mode lets you project a white or black screen or background pattern, and use the pen to write or draw as you would on a chalkboard or dry erase board. Select annotation mode Undo Stop or resume action in a video* Recalibrate Change custom pen color and width Change highlighter color Use black, red, or blue pen-select small dot for thin line Erase-select small dot for thin eraser Hide toolbar after each annotation Select whiteboard annotation mode Redo Zoom into image Use custom pen Use highlighter Use black, red, or blue pen-select large dot for thick line Erase-select large dot for thick eraser Clear all annotations Close toolbar * In annotation mode, the select background tool appears instead of this one. It lets you select the background color or pattern. EPSON and BrightLink are registered trademarks and EPSON Exceed Your Vision is a registered logomark of Seiko Epson Corporation. General Notice: Other product names used herein are for identification purposes only and may be trademarks of their respective owners. Epson disclaims any and all rights in those marks. This information is subject to change without notice. © 2012 Epson America, Inc. 11/12 Printed in USA CPD-38383 Ready to Learn More? • Sign up for complimentary webinars • Watch helpful how-to videos • Find out about cool, free interactive sites Click the BrightLink Training Resources link on your desktop or go to www.epson.com/eduresources.
-
 1
1 -
2
-
3
-
4
-
 5
5 -
 6
6 -
 7
7 -
 8
8 -
 9
9 -
 10
10 -
 11
11 -
 12
12
 |
 |