Epson BrightLink 475Wi User Manual - Page 33
Installing the Projector Feet, Removing and Attaching the Cable Cover
 |
View all Epson BrightLink 475Wi manuals
Add to My Manuals
Save this manual to your list of manuals |
Page 33 highlights
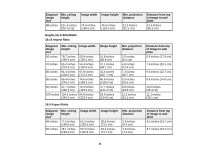
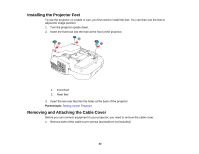
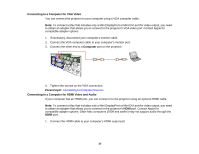
Installing the Projector Feet To use the projector on a table or cart, you first need to install the feet. You can then use the feet to adjust the image position. 1. Turn the projector upside down. 2. Insert the front foot into the hole at the front of the projector. 1 Front foot 2 Rear feet 3. Insert the two rear feet into the holes at the back of the projector. Parent topic: Setting Up the Projector Removing and Attaching the Cable Cover Before you can connect equipment to your projector, you need to remove the cable cover. 1. Remove both of the cable cover screws (screwdriver not included). 33
-
 1
1 -
2
-
3
-
4
-
5
-
6
-
7
-
8
-
9
-
10
-
11
-
12
-
13
-
14
-
15
-
16
-
17
-
18
-
19
-
20
-
21
-
22
-
23
-
24
-
25
-
26
-
27
-
 28
28 -
 29
29 -
 30
30 -
 31
31 -
 32
32 -
 33
33 -
 34
34 -
 35
35 -
 36
36 -
 37
37 -
 38
38 -
39
-
40
-
41
-
42
-
43
-
44
-
45
-
46
-
47
-
48
-
49
-
50
-
51
-
52
-
53
-
54
-
55
-
56
-
57
-
58
-
59
-
60
-
61
-
62
-
63
-
64
-
65
-
66
-
67
-
68
-
69
-
70
-
71
-
72
-
73
-
74
-
75
-
76
-
77
-
78
-
79
-
80
-
81
-
82
-
83
-
84
-
85
-
86
-
87
-
88
-
89
-
90
-
91
-
92
-
93
-
94
-
95
-
96
-
97
-
98
-
99
-
100
-
101
-
102
-
103
-
104
-
105
-
106
-
107
-
108
-
109
-
110
-
111
-
112
-
113
-
114
-
115
-
116
-
117
-
118
-
119
-
120
-
121
-
122
-
123
-
124
-
125
-
126
-
127
-
128
-
129
-
130
-
131
-
132
-
133
-
134
-
135
-
136
-
137
-
138
-
139
-
140
-
141
-
142
-
143
-
144
-
145
-
146
-
147
-
148
-
149
-
150
-
151
-
152
-
153
-
154
-
155
-
156
-
157
-
158
-
159
-
160
-
161
-
162
-
163
-
164
-
165
-
166
-
167
-
168
-
169
-
170
-
171
-
172
-
173
-
174
-
175
-
176
-
177
-
178
-
179
-
180
-
181
-
182
-
183
-
184
-
185
-
186
-
187
-
188
-
189
-
190
-
191
-
192
-
193
-
194
-
195
-
196
-
197
-
198
-
199
-
200
-
201
-
202
-
203
-
204
-
205
-
206
-
207
-
208
-
209
-
210
-
211
-
212
-
213
-
214
-
215
-
216
-
217
-
218
-
219
-
220
-
221
-
222
-
223
-
224
-
225
-
226
-
227
-
228
-
229
-
230
-
231
-
232
-
233
-
234
-
235
-
236
-
237
-
238
-
239
-
240
-
241
-
242
-
243
-
244
-
245
-
246
-
247
-
248
-
249
-
250
-
251
-
252
-
253
-
254
-
255
-
256
-
257
-
258
-
259
 |
 |
Installing the Projector Feet
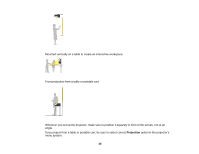
To use the projector on a table or cart, you first need to install the feet. You can then use the feet to
adjust the image position.
1.
Turn the projector upside down.
2.
Insert the front foot into the hole at the front of the projector.
1
Front foot
2
Rear feet
3.
Insert the two rear feet into the holes at the back of the projector.
Parent topic:
Setting Up the Projector
Removing and Attaching the Cable Cover
Before you can connect equipment to your projector, you need to remove the cable cover.
1.
Remove both of the cable cover screws (screwdriver not included).
33