Epson BrightLink EB-725Wi Installation Guide - Page 22
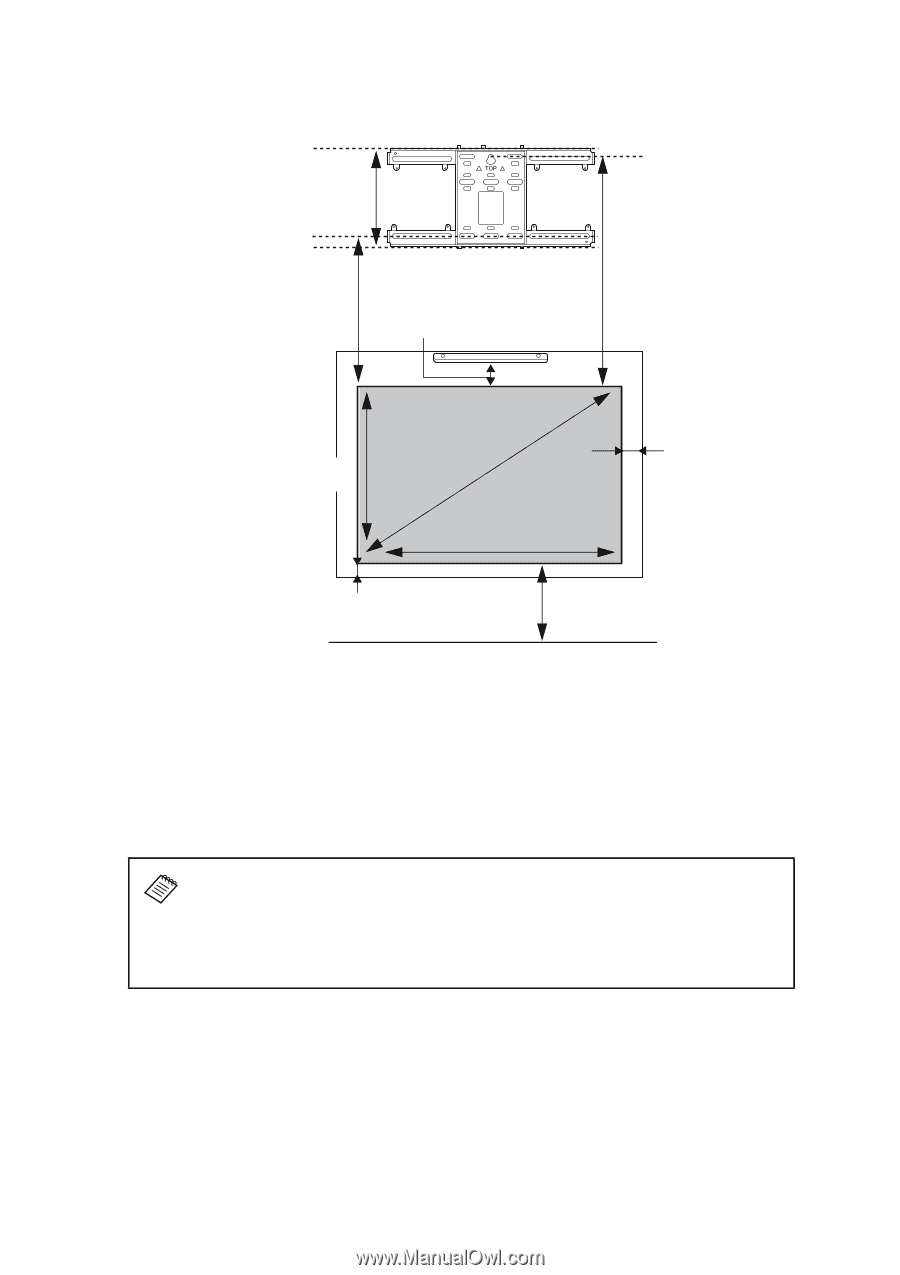
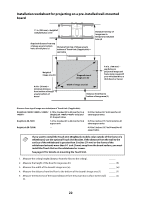
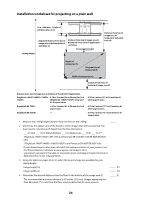
Installation worksheet for projecting on a pre-installed wall-mounted board
 |
View all Epson BrightLink EB-725Wi manuals
Add to My Manuals
Save this manual to your list of manuals |
Page 22 highlights
Installation worksheet for projecting on a pre-installed wall-mounted board 11 in. (280 mm)-height of wall plate plus cover Required distance from top of image area to bottom holes of wall plate (c) Distance from top of image area to bottom of Touch Unit (if applicable)- see below Distance from top of image area to temporary wall plate hole (d) Height of image area (h) 0.8 in. (20 mm)- minimum distance from bottom of image area to bottom of board Diagonal size of image area (S) Width of image area (w) 4.0 in. (100 mm)- gap between projected image and frame (only required if your whiteboard has a thick bezel or frame) Distance from floor to bottom of image area (f) Distance from top of image area to bottom of Touch Unit (if applicable): BrightLink 1480Fi/1480Fi+/1485Fi/ 0.79 to 2 inches (20 to 50 mm) for 16:6 1485Fi+ (BrightLink 1485Fi/1485Fi+ only) and 21:9 aspect ratios BrightLink EB-735Fi 1.61 to 2 inches (41 to 50 mm) for 16:6 aspect ratio BrightLink EB-725Wi - 0.22 to 2 inches (5.7 to 50 mm) for all other aspect ratios 0.70 to 2 inches (17.7 to 50 mm) for all other aspect ratios 0.54 to 2 inches (13.7 to 50 mm) for all aspect ratios If you want to install the Touch Unit (BrightLink models only) outside of the frame of a whiteboard, use the optional Touch Unit Bracket. If the distance from the wall to the surface of the whiteboard is greater than 2 inches (51 mm) or the frame of the whiteboard extends more than 0.1 inch (3 mm) away from the board surface, you must install the Touch Unit on the whiteboard or screen. See page 67 for details on mounting the Touch Unit. 1. Measure the ceiling height (distance from the floor to the ceiling). 2. Measure the height of the board's image area (h). 3. Measure the width of the board's image area (w). 4. Measure the distance from the floor to the bottom of the board's image area (f ). 5. Measure the thickness of the board (distance from the projection surface to the wall) (x). h) _____ (w) _____ (f ) _____ (x) 22
-
 1
1 -
2
-
3
-
4
-
5
-
6
-
7
-
8
-
9
-
10
-
11
-
12
-
13
-
14
-
15
-
16
-
 17
17 -
 18
18 -
 19
19 -
 20
20 -
 21
21 -
 22
22 -
 23
23 -
 24
24 -
 25
25 -
 26
26 -
 27
27 -
28
-
29
-
30
-
31
-
32
-
33
-
34
-
35
-
36
-
37
-
38
-
39
-
40
-
41
-
42
-
43
-
44
-
45
-
46
-
47
-
48
-
49
-
50
-
51
-
52
-
53
-
54
-
55
-
56
-
57
-
58
-
59
-
60
-
61
-
62
-
63
-
64
-
65
-
66
-
67
-
68
-
69
-
70
-
71
-
72
-
73
-
74
-
75
-
76
-
77
-
78
-
79
-
80
-
81
-
82
-
83
-
84
-
85
-
86
-
87
-
88
-
89
-
90
-
91
-
92
-
93
-
94
-
95
-
96
-
97
-
98
-
99
-
100
-
101
-
102
-
103
-
104
-
105
 |
 |