Epson C11C456021 Start Here Card - Page 1
Epson C11C456021 - Stylus Photo 960 Color Inkjet Printer Manual
 |
UPC - 010343844186
View all Epson C11C456021 manuals
Add to My Manuals
Save this manual to your list of manuals |
Page 1 highlights
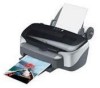
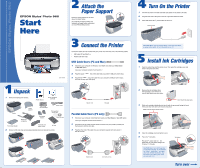
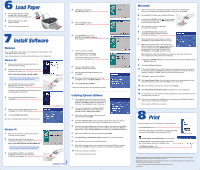
EPSON Stylus Photo 960 EPSON Stylus® Photo 960 Start Here CPD-14810R1 1 Unpack 1 Remove everything from the box. Printer Basics Printer Software CD-ROM Printer Paper support Basket for cut photos 7 Ink cartridges Roll paper holders Power cord Print position check disk Mini-CD ring Front sheet feeder Automatic roll paper cutter CD tray 2 Remove all the blue tape and packing materials inside and around the printer. 2 Attach the Paper Support Insert the paper support into its slots above the sheet feeder. (To install the roll paper holders and automatic roll paper cutter and basket, see your Printer Basics book.) 3 Connect the Printer Connection cables are not included with your printer. You need only one of the following cables: • USB cable (PC and Mac®) or • Parallel cable (PC only) USB Cable Users (PC and Mac) 1 Shut down your computer. In Windows®, click Start and select your Shut Down or Turn Off option. Leave your computer turned off until section 7. 2 Plug the square end of the cable into your printer's USB port until it stops. 3 Plug the flat end of the cable into your computer's USB port until it stops. (You can use any open USB port.) Square end Flat end Parallel Cable Users (PC only) 1 Shut down your computer. Click Start and select your Shut Down or Turn Off option. Leave your computer turned off until section 7. 2 Plug the end of the cable with the slotted connector into your printer's parallel port, then secure it with the wire clips. 3 Plug the other end of the cable into your computer's parallel port and secure it with the screws. Slotted end End with screws 4 Turn On the Printer 1 Connect the power cord that came with your printer to the printer's AC inlet. 2 Plug the other end of the power cord into a grounded electrical outlet. 3 Press and release the power button to turn it on. Power button CAUTION: Never use an external switch, such as a wall switch or power strip switch, to turn the printer on or off. 5 Install Ink Cartridges 1 Open the output tray and the printer cover. Then open the cartridge cover and remove the protective sheet. 2 Remove the ink cartridges from their packages. Don't remove or tear the blue labels from their sides. Don't touch the green part. 3 Slide each cartridge individually into its slot with the green part facing the back. Then push each one down until it clicks into place. Make sure the colored circles match. 4 Close the cartridge cover and printer cover. 5 Press the ink button. The green power and red ink lights flash as your printer charges ink for about 11/2 minutes. CAUTION: Don't turn off the printer or interrupt charging, or you'll waste ink. If the power and ink lights don't turn off after 5 minutes, and the printer isn't making any noise, you can turn it off. Ink button Turn over
-
 1
1 -
 2
2
 |
 |