Epson C11C456021 Start Here Card - Page 2
Load Paper, Install Software, Print - driver
 |
UPC - 010343844186
View all Epson C11C456021 manuals
Add to My Manuals
Save this manual to your list of manuals |
Page 2 highlights
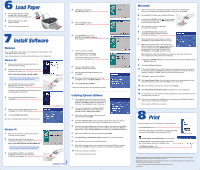
6 Load Paper 1 Fan your paper and place it against the right side of the sheet feeder (up to the arrow inside the edge guide). 2 Slide the edge guide to fit lightly against the paper. 3 Pull out the output tray extensions. 7 Install Software Windows If you're using Windows Me or 2000, see "Installing Your Printer Software" in the Printer Basics book for instructions. Follow the steps below to install the software for Windows XP or Windows 98. Windows XP 1 Make sure your printer is connected and turned on. Then turn on your computer. 2 Wait for Windows XP to detect your printer connection and display this screen: DON'T CLICK ANY BUTTONS ON THIS SCREEN. NOTE: If this screen doesn't appear, make sure your printer is turned on and connected. 3 Put the EPSON® CD-ROM in your CD-ROM or DVD drive and wait a few seconds for the CD-ROM to be recognized. Your printer software installs automatically and various messages appear on the screen. 4 At the final Found New Hardware Wizard screen, click Finish. 5 When you see the license agreement, read it and click Agree. You see the Options Menu: 6 Click Install Optional Software. Now go to "Installing Optional Software" in the next column. Windows 98 1 Make sure your printer is connected and turned on. Then turn on your computer. 2 Wait for Windows 98 to detect your printer connection and display a screen like this: DON'T CLICK ANY BUTTONS ON THE SCREEN YET. NOTE: If a screen like this doesn't appear, make sure your printer is turned on and connected. 3 Put the EPSON CD-ROM in your CD-ROM or DVD drive and wait a few seconds for the CD-ROM to be recognized. Continued 4 Click Next on the Add New Hardware Wizard screen. 5 Click the Search for option, then click Next. 6 Click CD-ROM drive, then click Next. Make sure Specify a location is not checked. 7 At the next screen, click Next. Installation proceeds automatically. When installation halts, click Finish. Your computer detects your printer again and you see a screen like this: 8 Continue clicking Next or Finish. Installation proceeds automatically. 9 At the final Add New Hardware Wizard screen, click Finish. 10 When you see the license agreement, read it and click Agree. You see the Options Menu. 11 Click Install Optional Software. Continue with the steps below to finish installing software. Installing Optional Software 1 At the Optional Software menu, click the button for each program to learn more about it. If you want the program, click Install and follow the instructions on the screen. Then click Back to return to the menu. 2 If you see a message about installing QuickTime®, click Yes and follow the on-screen instructions. You don't need a registration number. 3 When you're finished installing software, close any open windows and click Back. 4 Click View Software Offers. Click the button for each offer to learn more about it, then follow the instructions on the screen. Click Back to return to the menu. 5 If you see a message asking you to restart your computer, select No and click Finish. If your computer restarts automatically, you need to return to the menu. Click Start (on Windows XP), double-click My Computer, then double-click the EPSON CD-ROM icon. 6 When you're finished, close any open windows and click Back. 7 Click Install Printer Information Center and follow the on-screen instructions. 8 Close any open windows and click Exit at the menu. 9 When you see the registration screen, register your printer with EPSON as instructed. Remove the CD-ROM and keep it in case you need to reinstall any software later. 10 Restart your computer if prompted. You're ready to print! See section 8. Macintosh 1 Make sure your printer is connected and turned on. Then turn on your Macintosh. If you see a message about looking for software on the Internet, click Cancel. 2 Put the EPSON CD-ROM in your CD-ROM or DVD drive. 3 Double-click the EPSON CD-ROM icon on your desktop, if necessary, then double-click the EPSON installer icon in the window that opens. 4 Read and agree to the license agreement to continue the installation. 5 Click Install Printer Driver and follow the on-screen instructions to install the software and restart your Macintosh. 6 After your Macintosh restarts, register your printer with EPSON as instructed (Mac OS 8.6 to 9.x only). 7 Mac OS X: Open Print Center. If you don't see your printer in the printer list, make sure the printer is turned on and connected. Then select EPSON USB in the pull-down menu on the Printer List screen, click SP 960 (USB), and click Add. Close Print Center. Mac OS 8.6 to 9.x: Select the SP 960 icon in the Chooser. Select your USB port and turn on background printing. Then close the Chooser. 8 Double-click the EPSON CD-ROM icon on your desktop, if necessary, then double-click the EPSON installer icon. 9 Click Install Optional Software. 10 At the Optional Software menu, click the button for each program to learn more about it. If you want the program, click Install and follow the instructions on the screen. After each program is installed, click Back to return to the Optional Software menu. 11 Click Back to return to the Install Menu. 12 Click View Software Offers. Click the button for each offer to learn more about it, then follow the instructions on the screen. Click Back to return to the menu. 13 When you're finished, close any open windows and click Back. 14 Click Install Printer Information Center and follow the on-screen instructions. 15 For OS X users, if you want to print from Classic Applications, start your Macintosh in OS 9 and repeat steps 3 through 13. 16 Close any open windows and click Exit at the menu. Remove the CD-ROM and keep it in case you need to reinstall any software later. You're ready to print! See the next section. 8 Print Now you're ready to print. For instructions, use these resources: • Your Printer Basics book Learn about loading paper, printing photos and CDs, maintaining your printer, solving problems, and contacting EPSON. • EPSON Printer Information Center on your desktop Click Print Show to view helpful animations that show you how to load roll paper and use the automatic cutter. Click Reference Guide to view detailed information about your printer. EPSON and EPSON Stylus are registered trademarks of SEIKO EPSON CORPORATION. EPSON Software is a trademark and EPSON PhotoCenter is a service mark of Epson America, Inc. General Notice: Other product names are for identification purposes only and may be trademarks of their respective owners. EPSON disclaims any and all rights in those marks. Printed on recycled paper. Copyright © 2002 by Epson America, Inc. 12/02 Printed in USA
-
 1
1 -
 2
2
 |
 |
