Epson C1440AXIS Product Information Guide - Page 3
Hardware Installation, Using AXIS NetPilot to Install the Print Server to the Network
 |
UPC - 667026001031
View all Epson C1440AXIS manuals
Add to My Manuals
Save this manual to your list of manuals |
Page 3 highlights
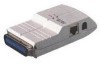
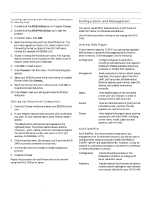
AXIS 1440 Network Print Server for EPSON Printers Hardware Installation 1. Locate and write down the serial number on the bottom of the AXIS 1440. You need this number during setup. 2. Turn the printer off and connect the AXIS 1440 to the printer's parallel port. 3. Connect the AXIS 1440 to the network using a twisted pair (10BaseT) cable. 4. Turn the printer on and connect the external power supply to the AXIS 1440. Check to make sure the network indicator is flashing. 5. Press the test button to print a test page. If the text page prints successfully, the AXIS 1440 is connected correctly to the printer. Using AXIS NetPilot to Install the Print Server to the Network 1. After installing the software from the AXIS Utilities disks 1 and 2 to your server workstation, double-click the AXIS NetPilot icon to start the setup program. Units that have not been installed appear in the New Axis Units folder. 2. Select your AXIS 1440 Print Server from the New Axis Units folder and click the Install button on the toolbar. The Installation Wizard launches. 3. Follow the Installation Wizard to complete setup. Setting Up Windows Workstations When you set up workstations for peer-to-eer printing, the appropriate Axis utility (either AXIS Print Monitor or AXIS Print Utility for Windows) must be installed on every workstation. For client-server printing, you only need to install this utility on the server workstation. To configure printer ports for Windows 95/98 1. Click Start, point to Settings, then click Printers. 2. Right-click your EPSON printer icon and click Properties. 3. Click the Details tab. 4. If your network supports NetBIOS/NetBEUI: t Select the AXIS printer port from the ports list and click OK. The port name appears as .LP1, where is AX followed by the last six digits of the AXIS 1440 serial number (for example, AX560B35). If your network supports TCP/IP (LPR): a. Click Add Port... b. Click Other and select AXIS Port from the list. Click OK. c. Select your network protocol, LPR (TCP/IP), and click OK. 5. Click Port Settings. If you want error condition pop-up messages to be displayed, check the Show printer error condition pop-up messages box and specify the frequency at which messages are redisplayed in the Printer Error Condition Pop-up Timeout option. Click OK to close the dialog box. 6. Click OK to save your settings. To configure printer ports for Windows NT: 1. Click Start, point to Settings, then click Printers. 2. Right-click your EPSON printer icon and click Properties. 3. Click the Ports tab, then click Add Port. 4. Select AXIS Port from the list, then click New Port... 5. Select your network protocol and click OK. 6. If your network supports NetBIOS/NetBEUI: t Select the AXIS printer port from the ports list and click OK. The port name appears as .LP1, where is AX followed by the last six digits of the AXIS 1440 serial number (for example, AX560B35). Click Close. If your network supports TCP/IP (LPR): t Enter the IP address or host name for your print server, then enter LPT1 as the printer name. Click OK, then click Close. 7. Click Configaure Port... If you want error condition popup messages to be displayed, check the Show printer error condition pop-up messages box and specify the frequency at which messages will redisplay in the Printer Error Condition Pop-up Timeout option. Click OK to close the dialog box. 8. Click OK to save your settings. 8/98 AXIS 1440 Print Server for EPSON Printers - 3
-
 1
1 -
 2
2 -
 3
3 -
 4
4 -
 5
5 -
 6
6
 |
 |
