Epson C31CA85090 User Manual - Page 12
Part Names, Installing the Printer Horizontally or Vertically, Setting Up the Printer
 |
View all Epson C31CA85090 manuals
Add to My Manuals
Save this manual to your list of manuals |
Page 12 highlights
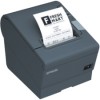
English Part Names See illustration A on page ii and the part names on page 1. Control Panel (Power) LED This LED is on when the printer is on. Error LED This indicates an error. Paper LED On indicates a paper near end or out. Flashing indicates standby. Feed button This button feeds paper. Installing the Printer Horizontally or Vertically You can install the printer horizontally on a flat surface (with the paper exit on top) or vertically (with the paper exit at the front) by hanging it on a wall, using the optional WH-10 hanging bracket set. WARNING: When hanging the printer on the wall with the hanging bracket set, be sure to attach a connector cover to the printer. Setting Up the Printer To set up the printer, follow the steps below. 1. Connect the cables. 2. Attach the connector cover. 3. Install the roll paper. Connecting the Cables CAUTION: For a serial interface, use a null modem cable. For a parallel interface, use an IEEE 1284 cable. For a USB interface, do not turn on the printer before installing the printer driver. 1. Connect the power cord, each interface cable, and the cash drawer cable to the connectors on the printer back. For the shape of each connector, see illustration B on page ii. (Mounted interfaces vary by specification.) 2. Connect the interface cable to the computer. 3. Insert the power cord plug into a socket. 4 TM-T88V User's Manual
-
 1
1 -
2
-
3
-
4
-
5
-
6
-
 7
7 -
 8
8 -
 9
9 -
 10
10 -
 11
11 -
 12
12 -
 13
13 -
 14
14 -
 15
15 -
 16
16 -
 17
17 -
18
-
19
-
20
-
21
-
22
-
23
-
24
-
25
-
26
-
27
-
28
-
29
-
30
-
31
-
32
-
33
-
34
-
35
-
36
-
37
-
38
-
39
-
40
-
41
-
42
-
43
-
44
-
45
-
46
-
47
-
48
-
49
-
50
-
51
-
52
-
53
-
54
-
55
-
56
-
57
-
58
-
59
-
60
-
61
-
62
-
63
-
64
-
65
-
66
-
67
-
68
 |
 |