Epson C82WN Printer Basics - Page 19
Customizing Windows Print Settings, to save your settings, return to the Print dialog box, and print.
 |
UPC - 010343845046
View all Epson C82WN manuals
Add to My Manuals
Save this manual to your list of manuals |
Page 19 highlights
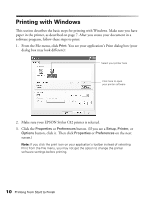
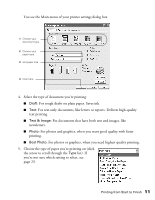
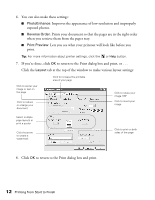
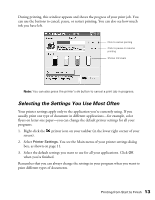
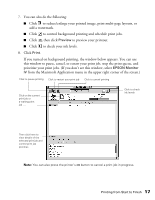
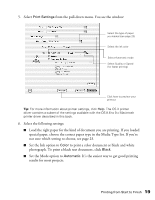
Customizing Windows Print Settings You can use advanced settings for color matching, printing at a higher resolution, or selecting a variety of special effects. 1. On the Main tab, click the Advanced button in the bottom right corner of the window. The Basic settings change to the Advanced settings. 2. Select the following advanced settings as necessary: Click here to select a paper type Click here to select print quality; includes Photo RPM, which gives the best results on photo and glossy paper types Click to improve the clarity of low-resolution images Select a color management method, or change the Gamma setting To choose No Color Adjustment, click ICM first 3. Once you've finished selecting advanced settings, you can: ■ Click OK to save your settings, return to the Print dialog box, and print. ■ Click the Basic button to return to the Basic settings. ■ Click Save Setting to save your custom settings for future use. Then click OK to return to the Print dialog box and print. Note: For more information about advanced settings, or instructions on saving them as a group so you can reuse them later, click the Help or button. If you want to use the Advanced screen each time you access your printer settings, select the Show this screen first checkbox. 14 Printing from Start to Finish
-
 1
1 -
2
-
3
-
4
-
5
-
6
-
7
-
8
-
9
-
10
-
11
-
12
-
13
-
 14
14 -
 15
15 -
 16
16 -
 17
17 -
 18
18 -
 19
19 -
 20
20 -
 21
21 -
 22
22 -
 23
23 -
 24
24 -
25
-
26
-
27
-
28
-
29
-
30
-
31
-
32
-
33
-
34
-
35
-
36
-
37
-
38
-
39
-
40
-
41
-
42
-
43
-
44
-
45
-
46
-
47
-
48
-
49
-
50
-
51
-
52
-
53
-
54
-
55
-
56
-
57
-
58
-
59
-
60
-
61
-
62
-
63
-
64
-
65
-
66
-
67
-
68
-
69
-
70
-
71
-
72
-
73
-
74
-
75
-
76
-
77
 |
 |
