Epson CX6600 Start Here Card - Page 7
Selecting the Stylus CX for Mac ® OS X, Selecting the Stylus CX for Mac OS 9, Any Problems - printer error
 |
UPC - 010343851436
View all Epson CX6600 manuals
Add to My Manuals
Save this manual to your list of manuals |
Page 7 highlights
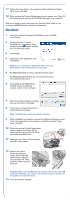
14 Plug the flat end of the cable into any available USB port on your Macintosh. Follow the instructions below to add the Stylus CX to the Print Center or Printer Setup Utility (for OS X) or the Chooser (for OS 9). Selecting the Stylus CX for Mac® OS X 1 Open the OS X Applications folder, then open the Utilities folder and start Print Center or the Printer Setup Utility. If you see this screen, click Add. 2 On the Printer List screen, click the Add button. 3 On the next screen, select EPSON USB from the pop-up menu. 4 Click Stylus CX6600. Note: If the CX6600 doesn't appear, make sure it is turned on and securely connected to your Macintosh. 5 Click the Add button. You see the Stylus CX6600 in the Printer List. 6 Quit Print Center or the Printer Setup Utility. Now you're ready to copy, scan, and print. See the Quick Guide or your on-screen CX6600 Reference Guide for instructions. 7 If you use Classic Mode applications, install the software on OS 9 also. Selecting the Stylus CX for Mac OS 9 1 Open the Chooser from the Apple® menu. 2 Select CX6600 Series, then select your USB port and turn on background printing. 3 Close the Chooser. Now you're ready to copy, scan, and print. See the Quick Guide or your on-screen CX6600 Reference Guide for instructions. Any Problems? If the red ! error light is on, check the message on the Stylus CX. Try turning the Stylus CX off and then back on to clear the error. If your problem is listed here, try these suggestions. For more information, see your Quick Guide, software Help, or on-screen CX6600 Reference Guide. The Found New Hardware Wizard appears on your screen. Click Cancel and follow the steps in section 6. Disconnect the Stylus CX before installing the software. You see an error message when you try to print or scan. Make sure your Stylus CX is connected to your computer, plugged into a power source, and turned on. The Stylus CX doesn't work. Make sure you removed the tape from the ink cartridge holder, as described in section 1. Turn the Stylus CX off and then on again. Make sure the ink cartridges are pushed all the way down. Check the LCD screen to see if you or someone else set the Security Lock. See your Quick Guide for details. Make sure your Epson Stylus CX6600 software is installed correctly.
-
 1
1 -
 2
2 -
 3
3 -
 4
4 -
 5
5 -
 6
6 -
 7
7 -
 8
8
 |
 |
